I came across this Blog which features scratch built ray guns;
http://jmelliott.blogspot.com/2008/04/ray-guns.html
Tony
Wednesday, 30 April 2008
Yours in white wine sauce Blog competition
German steam powered land-ironclad squad – Chapter Five
The main construction is completed and active field testing has begun, the Holt caterpillar mechanisms have proved to be very reliable and easy to maintain, achieving speeds of nearly four miles and hour. The walker engine and steam hydraulics are proving difficult to operate, however tests have been carried out and the progress has been positive.
Naval and Army engineers have begun to ‘customise’ individual elements of the equipment and guns, which has led to a number of mishaps as teams swap between vehicles. The obvious answer is to allocate individual vehicles to one or the other of the main arms, however senior commanders cannot agree and as such these little problems look like they will continue.
Following a mishap late last week, where one of the assault tanks, was miss-identified it has been decided that each of the four steam vehicles, the two Assault Tanks, the one Command Tank and the Assault Walker will be painted in very distinctive heraldry, and following this decision the individual vehicle commanders have also been agreed on as well as a simple allocation of overall command responsibility. One of the Assault Tanks and the Command Tank have been allocated to the Army Engineers Corps, while the second Assault Tank has been allocated to the Armed Naval Development Division. The Steam Walker has by necessity been allocated to the new and experimental ‘Q’ Division. In an attempt to integrate, the remaining crews will be a mix of Naval and Army personnel and each vehicle will display army numbers and identification as well as Naval ensigns!
The Fenian Airship (Toucan) – Chapter Five
Although construction is completed, there has been nothing but niggling issues with the whole project, tempers have flared and arguments have been seen to erupt in to fights and sulks. A noted independent American observer commented that The Fennian Irish are perhaps not best suited to such engineering feats! The same observer has now been admitted to a high security hospital while his injuries are treated.
Flight tests have once again been delayed and it is noted by those in the know that although the envelope has successfully been inflated and flown in tethered flight, the gondola, engines and equipment has not yet become airborne.
Development is painfully slow - there is even talk that the 80 day deadline may no longer be feasible! For the honour of the Fenian’s and Ireland we all hope that the Toucan can be operational in time.
A side effect of these recent setbacks is that candidates for the position of airship commander are disappearing fast. Nobody wants the responsibility of commanding a new and un-proven airship while the pressure and expectation of success is so palpable. It will be a brave man or a fool who volunteers for such a position. Test crews were initially recruited from amongst volunteers, however as the technical difficulties of this new form or warfare grow, the selection process that was initially envisaged has had to be modified, in fact there are now mercenary elements that have been recruited to fill key roles. Of special interest is the revised plan for crewing this Aeronef. The initial plan was to have two separate crews each training alongside one another and competing for the honour of becoming the ‘A Crew' and a dedicated ground team with engineering support. There now seams to be a core crew (with some dubious mercenary elements) and a very small back up team!
Monday, 28 April 2008
An inspirational miniature painting site
I have admired the miniature painting of Steve Dean for some time. The best description of his painting style is 'Kevin Dallimore style - clean and bright colours, painted in a very precise way and simply based'.
Check out;
http://www.steve-dean.co.uk/
I have tried to paint using the Foundry or Dallimore style, but find I want to use 'washes' which don't always work well with this style. If you want to see more of the 'Foundry' style - then Steve Dean is one of the very best exponents!
Tony
Check out;
http://www.steve-dean.co.uk/
I have tried to paint using the Foundry or Dallimore style, but find I want to use 'washes' which don't always work well with this style. If you want to see more of the 'Foundry' style - then Steve Dean is one of the very best exponents!
Tony
Saturday, 26 April 2008
Flash Gordon - Hawkmen part three
This is the latest in my collection of Hawkmen - a Hawkman officer.

The miniature is built in the same way as the previous three Hawkmen, painted with acrylics and mounted on a 4omm round base.
The base figure is from the prehistoric range of 40mm figures from Graven Images.
Of special note is the order I painted this figure. I started with the bronze, first painting it dark brown, then bronze and dark brown, then bronze and finally highlighting with gold. Once dry I applied washes of dark brown ink and Klear. When I was happy with the finish, I painted the rest of the figure with acrylic paints.
Tony
Flash Gordon - in Thailand
In 2007 my wife and I visited family who live in Bangkok, Thailand. We were over there for three weeks and during that time I had the opportunity to visit many shopping malls in search of model shops. There are very few, but what they do have are multipart collectable miniatures from Japan - a bit like 'Kinder Surprise' chocolate eggs sold in vending machines, but so many different themes.
I picked up a number of these models, usually second hand and costing no more than £1.50 each. Then once back in the UK I glued them together, re-based and painted them.
I am sure that a collector could tell you exactly what monster each of these represents, but to me they are just opponents for my 40mm Flash Gordon miniatures.
 The first is a winged lizard creature that came in parts and is based on a 40mm round base. I have painted it in the same colours as the original.
 Others in the 'Thailand collection' include a Lizardman/Lizard Monster - see above and based on a 50mm round base and some Fantasy Samurai that I intend painting as statues!
I picked up a number of these models, usually second hand and costing no more than £1.50 each. Then once back in the UK I glued them together, re-based and painted them.
I am sure that a collector could tell you exactly what monster each of these represents, but to me they are just opponents for my 40mm Flash Gordon miniatures.
The first is a winged lizard creature that came in parts and is based on a 40mm round base. I have painted it in the same colours as the original. The second is an armoured, giant turtle (or as I now know - a Gamera) this model came in nine parts and is based on a 60mm round base.
Others in the 'Thailand collection' include a Lizardman/Lizard Monster - see above and based on a 50mm round base and some Fantasy Samurai that I intend painting as statues!I also picked up a number of Thai and Japanese modelling magazines, which although I cannot read, do have some fantastic picture articles, particularly Mecha and Transformer models.
Tony
Current Projects - March 26th
- This week I have continued with my two entries to the Yours in White Wine Sauce Blog Competition - the German steam tanks & steam walker and the Fenian Airship Toucan. Modelling is finished and they have all been undercoated.
- I am still trying to make room in the attic - my son returns from University this summer and I know I will have to either sell (e-bay) or donate loads of books and magazines! If anyone is enterested, my e-bay store is http://shop.ebay.co.uk/merchant/korgrockking
- I have just finished a fourth Hawkman figure and I plan on up-loading pictures very soon. In addition a Lizardman/Lizard Monster has also been modelled, painted and based.
- I am also trying to sort out my pictures/photos on the home computer - the amount of files is making it very difficult to find any particular photo.
Tony
Friday, 25 April 2008
Shipyard - Hullcutters
In modelling aeronefs from Space 1889 (Sky Galleons of Mars) no collection would be complete without Hullcutters! In my collection I have two distinct styles 'High Martian Hullcutters' which tend to be better finished and more advanced and 'Low Martian Hullcutters' as seen below, which are slightly more crude.


 Construction of all three uses roughly the same techniques, a balsawood core with strip wood, cocktail sticks and cardboard glued with either superglue or PVA 'white glue'. I did produce a whole range of design sketches for these models, but in the end the models just 'grew', adding a bit here, trimming a bit there! In addition the Hullcutters used at 'Salute' in 2005 were also a great help in designing and building these models, see;
http://www.salute.co.uk/salutegames/cloudships/main.htm


The work-in-progress shots show the construction much better than words, but for a 'walkthrough', the construction would proceed as;
Balsawood shapes, first cut and then sanded to shape, glued together and then sanded again. Hull detail could be card or stiff paper glued with PVA glue and rams built from either stripwood (needed for strength) or balsawood. The detail around the ram is 'greenstuff', first added and when set, carved and sanded to shape.
Further detailing comes from plastic card and rod (the guns), cocktail sticks (the masts), matchsticks (railings) and scrap plastic from old toys or one of my favourite materials - knitting needles!
Before painting each of these models was painted with PVA glue and then base coated with a mix of acrylic paints and PVA glue.
The models are painted with sombre acrylic paints and Klear (Future in the US) washes. The flags are hand painted.
The propeller discs are cut with an Olfa compass cutter and each of the Hullcutters are based as are all of the fleet - on Games Workshop 40mm round bases. For anyone new to the site the models are built to the scale of 1/300 or 1mm = 1foot and are about 100mm to 120mm long.
Tony
Thursday, 24 April 2008
Flash Gordon - Leaper Demon
This particlular miniature is a Leaper Demon from Grim Reaper Castings that I picked up from Spirit Games in Burton on Trent, Staffordshire.
 I first saw the miniature in an on-line catalogue and knew that I wanted it, many months later and after a number of telephone calls, I was pleased to pick it up from Spirit Games, thank you.
 I first saw the miniature in an on-line catalogue and knew that I wanted it, many months later and after a number of telephone calls, I was pleased to pick it up from Spirit Games, thank you.
 The miniature came in six pieces - base, main body, two legs and two arms. I had to bend the legs and alter the stance so it would fit on the 50mm round base.
 The miniature is painted with acrylics, a sombre colour scheme of grey with small spashes of colour.
Althought the creature is quite fearsome, it always reminds me of the caterpillar in the Lewis Carrol book 'Alice in Wonderland'. In my alternative Flash Gordon Universe, I could picture it offering sage advice to space travellers!
Tony
Tuesday, 22 April 2008
Flash Gordon - Rocketship Mongo
No, this is not a scratchbuilt model, but a digital image produced by Kurokuma and available for sale at; http://www.daz3d.com/i.x/shop/itemdetails/-/?item=2196&cat=27&_m=d
 The image above is the Rocketship from Star Trek Voyager, the rocket that Captain Proton uses in one of the holodeck adventures.

I've included it on my Blog because I think its just fantastic and sums up my view as to what a Flash Gordon Rocketship should look like. Well done. I would hope that one day I can reproduce it as a model.
The image above is the Rocketship from Star Trek Voyager, the rocket that Captain Proton uses in one of the holodeck adventures.(Please note I accept that I do not have the copyright to either of these images and should there be an issue I will remove them immediately. The images are included as inspiration for future modelling projects only.)
'Traditional' Flash Gordon and Ming Rocketships (as seen in the black & white serials) can be found at; http://www.retro1-2-3.com/store/prodinfo.asp?number=112003275&variation=&aitem=6&mitem=10
The colour of Flash Gordon Rocketships is something that can cause some debate, my own view is that they should be silver. If not silver then they should be red and yellow!
Tony
Saturday, 19 April 2008
Flash Gordon - Mothman
In my search for suitable 40mm donor miniatures to increase my Graven Images Flash Gordon collection, I am always on the look out for figures I can convert. Mothman was such a project.

The miniature is a Super Hero figure and stands just over 50mm tall. The photo below shows the original miniatures based on a 40mm round base and the additional sculpting just begining.
 Graven Images figures have a style of of their own and as I convert or modify other suppliers miniatures I find that I have to 'bulk up' the sculpts to match-in. I believe that the photos show how I go about this better than words.
 This photo shows the modifications complete. I used 'green stuff' and the sculpting was done with a couple of dental tools and a cocktail stick. I decided to add a decorative plume to the helmet as I had just finished modifying a group of Flintloque Napoleonic figures and had seen the Austrian style plume in one of the books I was using.

The last two photos show the finished miniature, painted, varnished and based. The simple grey colour scheme was not planned but developed as the sculpt progressed.

I like the finished sculp and feel that I had been successful in capturing a particular look, the miniature is not based on any character or Flash Gordon figure, but has instead evolved.
Tony
Thursday, 17 April 2008
Where do you go to model/paint?
There have been a number of articles over the last couple of months that have highlighted where people model and paint. Here is my haven, a garden sun room that my wife bought for my 40th birthday.


The sun room is situated in the corner of the garden and is 2.5mtrs x 2.5mtrs with one corner cut at an angle, there are windows to two sides and a double, glass door to the side cut at an angle. This photo show one of the windows and my main workbench, which was cleaned for the occasion, allthough I should have changed the dirty water! There is electricity which allows light, heating and the use of power tools and a radio (since this photo was taken I have replaced the old black radio cassette with a DAB radio). The angle lights have 'daylight bulbs' and one is fitted with a magnifying lens, which I very rarely use.
Tony
Tuesday, 15 April 2008
Achtung Schweinehund!
I have just finished reading this very funny account of wargaming in the 1960's and 70's for the second time and it has lost none of its very cutting humour. I would recommend it to anyone of my vintage - born in 1959!
The book is written by Harry Pearson and has been available via discount book stores in the UK.
The book is written by Harry Pearson and has been available via discount book stores in the UK.

"A brilliantly funny and nostalgic look at 1960s and 70s childhood as well as a more serious examination of boy's (and some men's) obsession with war."
It is rare for me to laugh out loud while reading a book (Terry Pratchett is an exception), but this book had me laughing out loud and smiling all the way through!
ISBN 13: 9780316861366
Published Date: 18/01/2007
RRP: £9.99
Publisher: Little, Brown Book Group
Tony
Monday, 14 April 2008
Flash Gordon - Monster-in-my-Pocket part one
I have allready written about my search for suitable figures to support the Graven Images 40mm range of Flash Gordon miniatures. Here you can see two such toys from the collectable miniatures and card game called Monster-in-my-Pocket.

The first is the 'Bishop Fish' Number 47, from the Sea Monster group. The miniature was re-based on a 40mm round base and then re-painted with acrylics.

The first is the 'Bishop Fish' Number 47, from the Sea Monster group. The miniature was re-based on a 40mm round base and then re-painted with acrylics.

 The second miniature is the 'Haniver', number 17 from the Ancients group, this time based on a 50mm round base.
The 'toy' miniatures are made from flexible plastic and allthough very strong, still need to be cleaned, undercoated with white PVA glue and based before painting.
Both miniatures are re-painted as the original colour schemes.
The 'Monster-in-my-Pocket' sets are sold attached to card packaging with either one or three miniatures to a pack. I picked mine up from a variety of stores and priced between £1.00 - £2.00 per pack.
I will post additional photos of other 'Monster-in-my-Pocket' miniatures later.
Tony
Shipyard - The Steam Ram Florence
 The 165 ton Steam Ram Florence. Inspiration came from a 28mm scale model of the 165 ton Steam Ram Penelope, and captain Gustav Barnaby that I saw on the net. See below;
 I knew that I wanted to model this Aeronef, just as soon as I'd seen it and after the initial sketches, the hull was carved from three pieces of balsa - the bow, mid section and tail. Once they were about the right size and shape I glued them together and sanded them smooth.
The reason I carved them in three sections is that this particular hull is quite complicated and having tried to model it in one, I gave up. This revised technique suited the hull shape better.

The two 'work-in-progress' shots, show the model completed and undercoated. The main items of construction are; Ram section - sticky label, Main wheelhouse - thick white plastic used for double glazing, Mast - cocktail stick, Engine room - more thick plastic, Boiler - section of plastic pen, Tail - plastic card, Gun platforms - sections of knitting needles and Guns - plastic card and plastic rod.
 Additional detail is sections of plastic rod and small pieces of plastic card.
I have named the Aeronef 'Florence' after my Mother-in-law, I know that she likes the idea as many years ago I modelled an O'Gauge steam engine and named it 'Joseph' after my Father-in-law.
The model is painted with acrylics and the flag was hand painted.
Tony
Flash Gordon - Mudman
Mudman, or more correctly a 'Mudman Mountain' as the model stands over 60mm tall, and the model is kneeling!
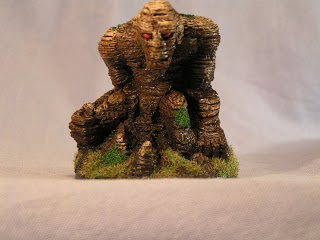 The model is a resin casting from Grendel (I think) and is mounted on a 60mm round base which meant that the casting was trimmed to fit!
The base is built up with Das modelling clay and certain features had to be re-modelled with 'Milliput' and 'green stuff' to make it fit, but I am pleased with the overall impact.
The model was painted with a mix of acrylics and then static grass was added.
Tony
Wednesday, 9 April 2008
An inspirational Blog
I've included this link as inspiration;
http://jmelliott.blogspot.com/2007/04/train-models.html
'You would expect me to say that the Flash Gordon Engine is my favourite and I'm not going to disappoint. Thank you. '
Tony
http://jmelliott.blogspot.com/2007/04/train-models.html
'You would expect me to say that the Flash Gordon Engine is my favourite and I'm not going to disappoint. Thank you. '
Tony
Tuesday, 8 April 2008
Flash Gordon - Combat car
The latest post shows one of my 'scratch built' Flash Gordon vehicles - a Combat car based on the Juggernaut from Undersea Kingdom, see;
http://en.wikipedia.org/wiki/Undersea_Kingdom
and
http://monstersinmotion.us/ships/hdjuggernaut1.html

http://en.wikipedia.org/wiki/Undersea_Kingdom
and
http://monstersinmotion.us/ships/hdjuggernaut1.html
 Here you see the completed model with the 40mm Graven Images miniature of Dr. Zarkoff.
The next four photos show the finished model prior to painting. The main construction is in fact plastic card over the wheel and track assemblies of the Games Workshop Rhino Mk1 tank, a second hand Rhino was taken apart and the two track assemblies covered in plastic card and then the front, top and rear sections added. The round section to the rear of the drivers compartment is a section of clear plastic tubing from a deodorant bottle, while the fin is 3mm plastic card. The radiator grill is sections of 1mm plastic card glued together and on to another piece of plastic card, the whole assemble was then sanded to shape, a very satisfying experience!
The rivet and strapping detail is plastic card and plastic rod (cut into thin slivers and glued on individually), the gun and gun mounting are sections of a propelling pencil glued to a plastic bead.


 Additional detailing is either plastic card, plastic rod or bits from the 'spares box'.
The model is very sturdy, being built on the GW Rhino, and the only real issue was painting, I had first tried to paint it silver, but it looked to 'toy like' and was repainted grey. The design on the rear fin is a roundel from a WW2 Mosquito with a seperate transfer of a lightning strike over a yellow disc from a GW transfer sheet placed on top.
Tony
Update - I have added two new pictures as posts on various yahoo sites and modelling pages commented on the colour - grey rather than silver. I thought that the first picture apeared too dark and so took some more in natural light. I hope that the combat car looks lighter in the newer posts, but also agree with some of the comments, I wish that I had left it silver!
Tony

Monday, 7 April 2008
Flash Gordon - Graven Images conversions
These photos are conversions of existing Graven Images Miniatures, or in the case of the first photo - the Tin Can Robot, a 'pre-production test piece'.

The Tin Can Robot was sculpted - or more accuratly modelled by me, it is one of my first production figures and was cast by Graven Images as a test piece. The original master was destroyed in the casting and this is a modified first metal casting. One point of note is that the original Tin Can Robot was not cylindrical but oval in cross section! This particular model was based on Dr Zatan's Robot and the tin can robot from Star Trek Voyager. The original was made from plastic tubing and knitting needles. The model is based on a 40mm round base.

The Tin Can Robot was sculpted - or more accuratly modelled by me, it is one of my first production figures and was cast by Graven Images as a test piece. The original master was destroyed in the casting and this is a modified first metal casting. One point of note is that the original Tin Can Robot was not cylindrical but oval in cross section! This particular model was based on Dr Zatan's Robot and the tin can robot from Star Trek Voyager. The original was made from plastic tubing and knitting needles. The model is based on a 40mm round base.

These two figures are conversions of Dale and Dr. Zarkof - Prince Barin and Princess Aura.

These two Lion Men are conversions of the Graven Images Werewolves, remodelled head and mane plus a tail! These Lion Men are based on the Lion Men from Flash Gordon the animated series, where Thun does not use weapons.

Graven Images Formorians - with re-modelled weapons, a pair of clubs rather than swords. These were a joy to paint, a lot of fun!

Klytus, (from the Queen Flash Gordon film), a conversion based on Rasputin, the special edition miniature and the head from a Terry Pratchett troll miniature.
Each of the figures above are based on 40mm round bases.

Finally in this section a modified werebear, modelled and painted as a Space Bigfoot Monster. The head has been repositioned, the arms pinned and the gaps filled with green stuff.
Tony
Sunday, 6 April 2008
My E-Bay Store
I've been clearing out the attic in preperation for my student son returning from three years of University and opened an E-Bay store, check it out at;
http://shop.ebay.co.uk/merchant/korgrockking
Many more items to follow, promise!
Tony
http://shop.ebay.co.uk/merchant/korgrockking
Many more items to follow, promise!
Tony
Flash Gordon - Girallon
Here is my latest Flash Gordon monster - a four armed, lizard tailed Girallon from D&D CMG - 'Fiendish Girallon' from the War Drums set - 47/60 CE 36


The figure was rebased, had the joints filled with green stuff before being repainted. I picked the miniature up from a recent wargame show for £1.00, a real bargain.
The miniature is just over 54mm tall (head to toe) and is mounted on a 40mm round base. I would suggest that the same figure could be used for 28mm Flash Gordon, Fantastic Worlds or Space Opera wargames.
Tony
Flash Gordon - The Cliffhanger figures
The main characters from the Cliffhanger range of 40mm figures from Graven Images - Ming, Flash, Dale and Dr. Zarkov


 And the main troops and officers


 And the main troops and officers

All finished miniatures are mounted on 40mm round bases.
Tony
Subscribe to:
Posts (Atom)


