Monday, 30 April 2018

The RAF at 100 - part nine


Prior to this photograph being taken, I have given the whole model a light wash of Galleria Matt Varnish mixed some highly diluted Citadel Sepia Wash to add some subtle weathering.

The model is mounted on to a 50mm x 50mm acrylic base (bought via e-bay) with the upright pole being made from a clear plastic cocktail stick/cocktail stirrer. The pole is 120mm tall and mounted to the base and the SE5a with short sections of plastic rod and superglue.


I am still thinking about adding a clear plastic disc to the front of the engine to mimic a turning propeller, but for now I am pleased to say that the SE5a is finished.

Tony

Saturday, 28 April 2018

The RAF at 100 - part eight


The decals/transfers were from a 1/144 Tornado and my spares box, they have been applied over Klear (Future) floor varnish and  'touched-up' with acrylic paints before being matt varnished with Galleria Matt Varnish.


The tail numbers have been hand painted. It is interesting how the fuselage colour looks so different under internal light and photographed against my usual blue background rather than the natural light of the shed.


Tony

The RAF at 100 - part seven


The wheels, gun and struts have been painted - the next step is varnishing and adding the main markings.

Tony

Friday, 27 April 2018

The RAF at 100 - part six


A small update, the engine and exhausts have been painted.


Tony

Wednesday, 25 April 2018

The RAF at 100 - part five


I've started painting the markings. Once again using the illustration from page 115 of Aces and Aircraft of World War 1 by Christopher Campbell. The fuselage band and the tail markings are hand painted (it is not easy finding decals/transfers for these tiny aircraft!)


Hopefully I can get it finished before the end of the month.

Tony

Monday, 23 April 2018

Shed Spring Clean


Dry weather, not too warm and nothing planned. The perfect day to Spring Clean the Shed!

In addition to taking some bags of rubbish to the tip, I re-painted the window surrounds and spent some time removing glue from the wooden floor. The hot glue gun tends to 'dribble' and leave small dew-drops of glue which are frustrating.

The shed is now 18 years old and I'm sure I'll get a few more years of use out of it.

Tony

Sunday, 22 April 2018

The RAF at 100 - part four


The main fuselage colour is a brown/khaki as seen on many illustrations of the SE5a, The inspiration for this colour came from a book called Aces and Aircraft of World War 1 by Christopher Campbell. I have used the illustration on page 115 rather than the cover illustration which I thought was too green.

The model was painted with a custom mix of brown, Ochre and Leather acrylic paints and once again two or three light coats were used instead of one heavy covering. As with the earlier undercoat, the colour was streaked from front-to-back, in the direction of airflow.

Tony

Saturday, 21 April 2018

The RAF at 100 - part three


I have undercoated the model in Linen, a cheap craft paint which was applied with a large flat brush in the direction of airflow over the model. Two or three light and watered-down coats are better than one thick one. As you can see, I have used a cocktail stick and a small piece of balsawood to hold the model while painting.


Tony

Thursday, 19 April 2018

The RAF at 100 - part two a 100th scale SE5a


To commemorate the 100th anniversary of the founding of the RAF I wanted to produce something, a model a piece of terrain, anything. I settle on a 1/100th scale SE5a. I have in the past written about a stalled project - scratch building WW1 aircraft for gaming, see this post for more details and even had an article published in Miniature Wargames, see this post.

This particular model was built some time ago and has languished in a cardboard box for long enough. It is time it was painted. The model was built from hand drawn plans reduced from 1/72nd scale. The fuselage is a piece of scrap wood, the wings plastic card and the tail thin card. Detailing was carried out with plastic card and rod. The main construction was done with superglue and PVA glue.

The model is 64mm long with a wingspan of 80mm.

Tally-Ho.

Tony

Wednesday, 18 April 2018

Meccano Build a Crane


The latest part work available at W H Smiths is this Meccano Crane. Part one is available for just £1.99 and I have picked it up as for this money, I am sure I will find a use for the parts and the packaging. I have no intention of subscribing for the additional part works, but saw this and thought - "that's a bargain". I can add it to the small amount of old Meccano I have in the garage.

For more details see this link.

Tony

Monday, 16 April 2018

Book Treasures and where to find them - part three Sedgeberrow Books, Pershore


Continuing with this series of recommendations, I present one of my favourite book stores; Sedgeberrow Books, Pershore, a secondhand and new book store that is situated in the pleasant market town of Pershore, Worcestershire.

The rather narrow frontage hides the fact that this shop stretches back some distance and contains what I believe to be the largest secondhand aviation and military book selection in the Midlands. The aviation section in particular is simply breathtaking with floor to ceiling shelves crammed full of unique and very hard to find aviation book titles in many different languages. The Military and Naval shelves are equally packed with a similar selection while to the front of the store there are shelves upon shelves of railway books. Please be aware that there are both secondhand and new publications intermixed and on display.

It is rare that I visit the shop and don't come away with some rare or unusual treasure. I give this very special shop a 5 Bookworms out of 5 and recommend Pershore as a great day out, particularly during The Pershore Plum Festival in August.


Sedgeberrow Books can be found at;
25 High Street
Pershore
Worcestershire
WR10 1AA

01386 751830

Tony

Sunday, 15 April 2018

An Industrial Narrow Gauge Adventure - the layout part thirty-four


The latest update shows most of the painting done, the wooden strips holding the tar paper in place have been hand painted with acrylics and a fine brush, the sofit boards and roof panels have been finished and I have added some additional detailing to the door.


These two images show the low relief nature of this building better and the final image is a detail shot of the door area.


Tony

Friday, 13 April 2018

Models For Wargamers - just 10 signed copies left


There are just 10 signed and numbered copies of Dampfpanzerwagon Guide No. 3 - MODELS FOR WARGAMERS left. I do have a few additional un-signed copies, but would advise anyone interested in purchasing a copy to act fast. For full details of how to order please see this link.

In addition there are a few copies of Dampfpanzerwagon Guide No. 2 - MORE WARGAME TERRAIN books available for details of how to order see this link.

Dampfpanzerwagon Guide No. 1 - BUILDING WARGAME TERRAIN is no longer available.

Please note; I will not be attending SALUTE.

Thank you.

Tony

Wednesday, 11 April 2018

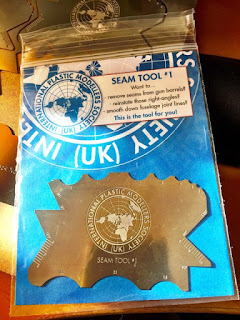
Seam Scraper tool from IPMS


I recently treated myself to this new toy. A SEAM TOOL #1 or seam scraper from the IPMS (international Plastic Modellers Society). For full details see this post.

For those who are unfamiliar with this type of tool, imagine scraping the edges of plastic kits with the edge of a scalpel to remove burrs or rough edges or having to remove the join line of a gun barrel. This innovative tool will do all that and more by using the edges of the metal tool to scrape along the edges of plastic (or resin) to produce a smooth joins or edges. The ends and curved edges are a multipurpose profiling tool that should have hundreds of uses.


If you want one - see this link. At just £5.00 (plus P&P) it's a bargain. Also available to Non IPMS Members.

Tony

Sunday, 8 April 2018

The RAF at 100


It cannot have escaped your attention that 2018 sees the RAF celebrating its 100th anniversary. I thought that this historic milestone deserved a special modelling project and over the next couple of weeks my plan is to produce a suitable model (maybe even models) to commemorate this event.

Stay tuned for updates.

Tony

Friday, 6 April 2018

An Industrial Narrow Gauge Adventure - the layout part thirty-three


These latest images show the progression so far on this low-relief, back scene building for my small shelf layout. The model is built to the rather unusual scale of 1/27.7 or 11mm = 1 foot which represents 18 inch narrow gauge running on standard HO-OO or 16.5mm Peco Crazy Track. For more details see the Narrow Gauge or 1/27.7 labels to the right. Or browse the earlier Industrial Narrow Gauge Adventure headings.

Since the last post, I have painted the exposed wooden panels and the black tar paper covering. The wooden sections were individually painted with acrylic paints following some tutorials found on the Internet showing worn and decaying wood while the tar paper has been painted in off-black colours with some streaking.


In the final image you can see the exposed wooden structure in greater detail. The technique I have used is to paint the wooden structure in watered down acrylic paints, drybrush the exaggerated wood grain and then use washes to highlight the sculpting. Extra colour was added with watercolour pencils which are sharpened to a very fine point - a slow and laborious process but one that I feel portrays exposed wood in a very realistic manner. The external telephone bell was copied from another image found on the Internet. It is scratch-built from sections of plastic rod and thick plastic card. The wiring is fusewire.


The next job will be to paint the wooden stays or supports that hold the tar paper in place and painting the fibreboard roofing panels.

Tony

Tuesday, 3 April 2018

An Industrial Narrow Gauge Adventure - the layout part thirty-two


Unlike the brick built base of the Salt Pan (see earlier posts) the brick wall on this part of the layout was impressed into pizza foam (the foam that you find as backing to frozen pizzas). The painting was done over a thin layer of cream and grey acrylic (the mortar) and then the orange/red brick colour was drybrushed over the bricks. The finished effect took many layers of red, brown and orange drybrushing but I think the effect was worth while. Once fully dry, individual bricks were picked out with a fine pointed brush in darker black colours and lighter white.

The whole wall has been washed in different coloured washes and I have used watercolour pencils to highlight some bricks as well as produce the simple graffiti.

The metal door was painted in greys with rust effects on the lower edge and some more watercolour pencil detailing on the door furniture. The door design and colour was copied from a similar door I had seen on the Internet.


The final image shows the low-relief building against the office wall to show the effect I was looking for.

Tony

Monday, 2 April 2018

Malvern Flea Market


Earlier this morning, Sue and I visited the Malvern Three Counties Showground Flea Market. This was the first time I had been to this event (I had previously attended the Toy Fair and Vintage Car Show). It is quite a big event filling most of the inside halls and overflowing on to the open air hard standing. My own purchases were few and cheap. a book called Saunders and Saro Aircraft since 1917 by Peter London.

We were on our way back home by mid day and are now looking forward to an Easter Monday lunch with our daughter Holly.

For more details of future and planned events see this link.

Happy Easter.

Tony