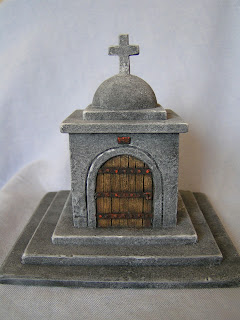
The Small Witchlands Tomb
First published on Barking Irons Online back in 2012.
Another Masterclass tutorial that was 'lost' when Barking Irons Online closed down. This model was constructed at the same time as the large Tomb (see below - which also features in Dampfpanzerwagon Guide No. 3 - Models For Wargamers) and was intended as an addition to my existing graveyard scenery collection.
For details of how to order a copy of Models For Wargamers please see this link.
For details of how to order a copy of Models For Wargamers please see this link.
Introduction
The smaller square tomb uses the same materials (scraps of blue foam), glued into a cube shape and then sanded square similar to the larger one shown above. The door is made from textured lollipop sticks stuck to thin card before being glued into the doorway with a hot glue gun.
The first step was to carve and texture the stonework. I first cut shallow horizontal lines around the building. I varied the height to give same interest then cut small vertical cuts with a scalpel to simulate the rough stone blocks.
The cuts were opened-up with the point of a sharp pencil, first the horizontal and then the vertical cuts.
To texture the blocks, I used a broken stone from the garden to press random groves and indents into the blue foam. Then with a piece of thick plastic card I pressed into the foam to vary the depth or height of some stones.
More detail
I also added a simple triangular roof cut from blue foam over a square of plastic card and further textured the walls by vigorously brushing the foam with a stiff brush. Prior to this photo being taken, I have added odd stone blocks from DAS modelling clay and given the whole structure a coat of thinned-down ready-mixed filler and PVA glue.
The wooden door was modelled from cut down and coloured lollipop sticks then glue in place with my hot glue gun.
Note; There are many and varied techniques for texturing blue foam, you can use sandpaper, stiff brushes and even wire brushes to distress the foam.
Cutting down on the height
Between the last image and this one, I have removed 8mm from the base of the tomb as I thought it looked too tall.
I mounted the tomb onto an oval of 3mm thick plastic card with my hot glue gun and chamfered the edges before adding a blue foam step to the doorway and building up the groundwork with DAS.
Groundwork
The base or groundwork was textured with sieved stones and fine sand added over PVA glue. While later the whole tomb was coated with a custom mix of ready-mixed filler, PVA glue and some white acrylic paint.
The door has been detailed with slivers of plastic rod glued in place with superglue and the walls have been painted a very nice shade of Mint Green – Oh no they haven’t! In a further attempt to add even more surface texture to the stonework I have mixed up some PVA glue and very fine sand the sort that is used to make children’s sand pictures and comes in a wide variety of colours, in this case green! When painted on to the tomb, the fine sand adds surface detail but also turned the model pale green.
Painting
The painting was done in the same way as the previous tomb. I used a mix of very dark brown and black to basecoat the model.
The first highlight was a red-brown tube acrylic paint which I ‘scrubbed’ on. A second and lighter drybrush of Snakebite Leather was added to the roof and corners of the building to add further highlights.
The second highlight was a grey mix and again ‘scrubbed’ on.
Note; By ‘scrubbed’ I mean that I have used a stiff brush and little paint to vigorously scrub the stonework – a bit like drybrushing but with a stiff brush and with more force.
The third or light grey highlight was drybrushed on with a large brush.
I decided to paint the door of the tomb green, as I wanted to add some colour to the ‘grey’ stonework. I used a Dark Angels Green base, highlighted with Forest Green from Foundry and then further highlighted with some Forest Green/Snakebite Leather.
The door studs were painted Black, Bestial Brown and then selectively highlighted with small touches of Hot Orange from Vallejo .
Finishing of
Next came the groundwork. Regular readers will not be surprised that I have started with Snakebite Leather from Games Workshop. (What would I do without this paint pot?) A number of lighter drybrushes later and the odd stone picked out in grey – painting finished.
Prior to adding the dyed sawdust base, I gave the whole building a very light drybrush of Skull White as I felt it looked too grey and needed highlighting.
The base was treated to a layer of dyed sawdust and some static grass which was applied over PVA glue and the model tomb is now ready for my gaming table. The simple tomb is ideal as a starter model or for use on a Frostgrave themed table.
This is another of the 'lost' tutorials that were written for Barking Irons Online. It is my intention to post all of these tutorials on my Blog over the next couple of months.
This is another of the 'lost' tutorials that were written for Barking Irons Online. It is my intention to post all of these tutorials on my Blog over the next couple of months.
Tony


Great stuff, Tony.
ReplyDelete