Saturday, 31 October 2015

No Laughing Matter - a Halloween Special on Orcs in the Webbe


It has over the years become something of a Flintloque/Slaughterloo tradition for me to write an All Hallow's Eve short story for Orcs in the Webbe.

This year I have penned a tale called The Witchlands - No Laughing Matter. The full story can be found here on Orcs in the Webbe - I hope that you like it.

The OITW web site is owned and edited by Craig Andrews and I think we all owe him a great big thank you for continuing with this 'labour of love' particularly as he has for the last couple of months had his hands full with little Samuel. Well done Craig and I look forward to the up and coming 2015 Advent Calendar.

Happy Halloween, and my thought are, as always at this time, with Uncle Rogipoos, you are still greatly missed.

Tony

Thursday, 29 October 2015

Mont Saint-Michel for Young People


I picked up this illustrated children's book from a charity shop for 49p. The illustrations are similar to the Angus McBride Look and Learn illustrations.

Here are just a few from Mont Saint-Michel for Young People.


The illustrations are by Pierre Joubert and the book is published in France by Editions Ouest-France as part of the History in Pictures collection edited by Lucien Bely. This English translation was done by Paul Williams.

I have searched the Internet for further illustrations by Pierre Joubert and can confirm that there are quite a few that would be of interest to the military painter/gamer.

Tony

Tuesday, 27 October 2015

Gnome Bakery for Panzerfauste


The Panzerfauste Kickstarter has now reached £20,000 plus, easily outstripping the £5,000 goal and it still has 12 days to go!

For details of the Panzerfauste Kickstarter from Hysterical games, please go to this post.

I have already commented on the fact that I have pledged towards this game and been involved in building themed terrain for the game. I can now report that the first of my scratch built building is planned for production in resin when the Kickstarter pledge reaches £25,000.


The Gnome bakery has already featured on this site, for details see this post the first test model was painted up by Steve Blease, of Bleaseworld. I have included this work-in-progress shot below. The Bakery was designed on a scrap piece of paper when Rob Alderman and I met up at the Costa Coffee shop in Leomington Spa to first discuss this project. The drawing featured in the 'Great British Bake Off' logo at the top of the page is the actual rough sketch!


I can also confirm that some additional 'test' models have been painted by Ant Evans of The Anarchy of Anton. details can be found here.

The small Bakery was designed to show how important food is to these Panzerfause Gnomes and although intended for Panzerfauste - I believe that it could be used with many Fantasy based games.

I look forward to seeing it in full production. Be aware that there are many more Panzerfauste themed terrain pieces already produced and waiting patiently in the wings for authorization and clearance for me to post details.

Tony

Sunday, 25 October 2015

Frostgrave Terrain - part five


The latest piece of Frostgrave themed terrain - a small rock outcrop.

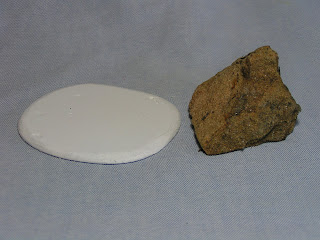
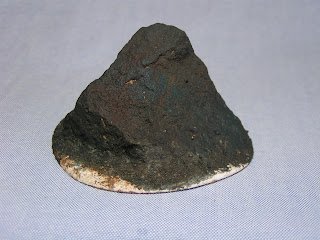
Images Two and Three - I have used a scrap piece of Blue Foam, some stones from the garden and an oval of 3mm thick plastic card to produce this small piece of scatter.

In these images you can see how the groundwork has been built up from DAS modelling clay and the base further textured with sieved stones and sand applied over uPVA glue.

I have undercoated the Blue Foam with uPVA glue.


Image Four - The basecoat is once again a mix of black, white brown and blue.


Image Five - The first drybrushing is added. This is to help define the detail and is quite a thick or sloppy drybrushing.


Image Six - The second drybrushing is much lighter and a true drybrush - having very little paint on the brush. I have also started to tint the rocks with washes.


Image Seven - The base or groundwork is painted in my usual Snakebite Leather, highlighted with a Snakebite/White drybrushing.


Image Eight - Individual stones have been picked out in a grey colour highlighted white.


Images Nine and Ten - The model has been varnished with Galleria matt varnish and the base further detailed with railway scatter and static grass clumps.


The model is 85mm x 65mm and 60mm tall.

Once again, I have not added any snow to the model. I plan on adding it later.

Tony

Friday, 23 October 2015

White Dwarf Issue No. 2


This is a bit of a special post for me, actually a very special post. Earlier today Sue and I had a day out in Cirencester, Gloucestershire and as we promenaded around the town centre. I popped into the Oxfam Book Shop and picked up a copy of White Dwarf - issue 311, an issue that I had not read. As I approached the counter I was asked if I collected White Dwarf. I replied that I was not such a big fan of the later issues but had quite a collection of the earlier issues stored in the attic.

Lawrence - the shop assistant said that upstairs he had White Dwarf issue No.2 and some other early issues, he asked if I was interested in seeing it?

Is the Pope a Catholic?

After some time he brought down a beautiful, pristine copy sealed in a plastic protector wallet and said that this copy was available for £25.00.

I have to say that I was tempted and agreed that it was probably worth a lot more - closer to £40.00 - but I just couldn't bring myself to spend that much money on an early WD. We chatted for some time and I thanked him for allowing me to at least say that I had once handled a copy of White Dwarf issue 2!

It didn't take long for the doubt to set in - actually about twenty steps.

Sue said that she would buy it for me as a Christmas present, but I (after some self doubt) relented and with debit card in hand I succumbed to the temptation and bought it.

As I sit here writing this post the still wrapped issue of White Dwarf no. 2 - is still wrapped! I am really nervous about what I will find when I open the plastic wallet, will I be disappointed? How can it live up to my expectations?

I'll report back later if I have been brave enough to open the plastic wallet and what I found inside.

Tony

For anyone interested and you'll have to be fast as I would not expect these magazines to be around for long, Oxfam Cirencester has some more early White Dwarf magazines for sale.

Details of the store are;

Oxfam Book Shop
7 W. Market Place
Cirencester
Gloucestershire
GL7 2NH
Tel; 01285 658726

So, where do you get your plastic card from?


I regularly get asked; "So where do you get your plastic card from?"

And usually reply, from second hand sources or ex-display material. In this post I thought I would be a little more specific.

Yesterday I picked up a large piece of 5mm thick plastic card from a DIY superstore in Droitwich. The plastic card was used as display material in the garden centre and was being thrown away.

I asked an assistant if I could have it - explaining that I would use it for model making and was told that I could have it for free.

In these images I have cut the large single panel into three 500mm x 400mm smaller panels.


This plastic card has a green surface covering which is part of the material, sometimes this outer covering is 'sticky-back' plastic and can be removed, in this case it is a fixed feature. I think it is painted onto the surface.

Plastic card comes in various firmness - the surface can be quite soft, medium strength of full strength/hard. I usually define this strength of toughness by pressing my finger nail into the surface. The softer material can be easily marked with your fingernail and is ideal for carving and indenting the surface (I use a rough stone, but you can use rolled up silver foil), you can also flex the panel, a bit like thick card. The medium strength plastic card, can also be carved, but takes indents less than the softer variety. The third type is very strong and has no flex. This is ideal for stronger structures or layering - building up a thicker structure and then carving and/or sanding to shape.

These panels are of the stronger type and will be used as bases for larger pieces of terrain.

I hope that this post helps others to both identify the different types of plastic card and give ideas as to where to get it from.

Tony

Thursday, 22 October 2015

The Dovecote at Brokencote Hall Hotel


Last week Sue and visited Brokencote Hall for cream tea and a walk around the grounds. We had been given the afternoon tea as a gift from Holly, John, Gary, Beckie, Finley and Flo and as a wedding anniversary present.

The dovecote is situated to the left of the man-made lake and offers modellers a great on-off structure to model.

Full details of the hotel can be found here.


Tony

Monday, 19 October 2015

More Wargame Terrain Book still available to buy


A quick post just to remind everyone that Dampfpanzerwagon Guide No. 2 - More Wargame Terrain is still available to purchase. for full details please go to this link.

Earlier this week, I received orders for two books, one to America and the second to Germany. Stocks of Book Two are now limited, so if you are thinking of purchasing one, please contact me via the link.

It has been some time since Dampfpanzerwagon Guide No. 1 - Building Wargame Terrain sold out and at this time I am not looking to have a re-print or a PDF.

Tony

Sunday, 18 October 2015

Frostgrave Terrain - part four


Following on from the two earlier posts detailing how I build my simple Frostgrave terrain, I have in this piece of scenery combined the soft cream insulation foam and a rock from the garden to produce a hybrid.

Images Two and Three - The rock and foam have been glued to a piece of 3mm thick plastic card which was picked up at my local ALDI's store. The plastic card was/is a sign detailing new offers and was found, abandoned in the carpark. Recycling at it's very best.


I have built up the groundwork with DAS modelling clay.


Image Four - After adding sieved stones and sand to the base the basecoat is a mixture of black, white, brown and blue - as detailed in the earlier posts.

The metal pumpkin was given to me free of charge from Dark Arts Studio earlier this month and I thought it looked OK tucked into the rock face. I certainly adds colour!


Images Five and Six - Further painting and highlighting was done by drybrushing the rock face with a large flat brush. I have further highlighted the rocks with various 'washes'.


Image Seven - The groundwork was painted in my usual mix of Snakebite Leather and Snakebite/white highlights.


Image Eight - The pumpkin was built up from a mid-brown, highlighted with orange and then further highlighted with yellow.


Image Nine - After varnishing with Galleria Matt varnish, I have added both  railway scatter and some static grass clumps.


Another piece of Frostgrave terrain finished and ready for the gaming table. As I have noted in earlier posts, I will add the Baking Soda snow later.

The model is 110mm long x 50mm wide and 40mm tall.

Tony

Friday, 16 October 2015

Frostgrave Terrain - part three


My latest piece of scratch built terrain for Frostgrave started as a simple stone from the back garden.

Image Two - The stone and an oval of 3mm thick plastic card.


Image Three - I glued the stone in place with my trusty Hot Glue gun.


Image Four - And built up the groundwork with DAS modelling clay.


Image Five - The groundwork was further textured with some sieved stones and sand sprinkled over uPVA glue.


Image Six - The basecoat was a mix of black, white, brown and blue. I tend to add these colours with a large brush and mix them on the model rather than on a palette.


Image Seven - The drybrushing began with a lighter mix of the black, white and blue colour. I apply the drybrushing with a flat or chisel headed artist brush.


Image Eight - A second drybrushing of white on the highest points.


Image Nine - The groundwork or base was painted in my usual colour mix of Snakebite Leather from GW with highlights picked out with a Snakebite/white drybrush.


Image Ten - The base was further detailed with some of the individual stones picked out in a black/white mix. I have also 'washed' the model with various brown and sepia washes. I like to 'blur' the join between the stone and the base colour and I think this is illustrated perfectly in this image.


Image Eleven - the base was decorated with flock, railway scatter and static grass tufts after being varnished with galleria Matt varnish.


This model is 75mm x 70mm and 50mm tall. It cost virtually nothing to make as the stone was free, the plastic card picked up from a DIY store carpark, the rest of the materials and paint was already in my possession.

Stay tuned for further examples of scratch-built terrain in future posts.

Tony

I also recommend watching this interesting tutorial from Tale of Painters on painting stones and applying snow.