Monday, 29 February 2016

Oldehammer Building No. 2 - part six


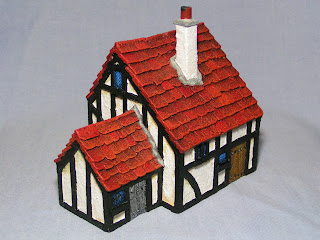
Building No. 2 finished. The beams have been painted with a black/brown mix as I felt the pure black was a little too stark and the windows have been painted blue with white highlights.

Further detail painting was done around the chimney and doors.


The final image shows the two Blood Bath at Orcs Drift card inspired buildings. They have been great fun to build, but I'm not sure what I will be doing with them.


For more details please see earlier posts.

Tony

Sunday, 28 February 2016

WE HAVE A WINNER!


Today sees this Blog celebrate its eighth anniversary and as noted earlier this month I had decided to offer a free prize draw for one each of the two Dampfpanzerwagon Guides/Books. The Dampfpanzerwagon Guide No. 1 - Building Wargame Terrain has been sold out for some time with all copies bar one being sold. I still have a number of copies of Dampfpanzerwagon Guide No. 2 - More Wargame Terrain for sale - if anyone is interested in purchasing a copy, please see the links to the right on the main Blog page. The book is available for just £15.00 (plus postage).

I had 48 comments and my daughter picked the winning name at random.

Full details of the free prize draw can be found here.

The winner is John Lambshead of John's Toy Soldiers and I will be contacting him later to arrange for the two books to be delivered to him. Congratulations John - I hope you enjoy them.

Thank you to everyone who took part.

Tony

Saturday, 27 February 2016

Oldehammer Building No. 2 - part five


The painting started with an all over white or off-white base coat. I then painted the roof tiles in a red/orange mix, varying the colour by adding orange or red as I painted the roof and picking out odd tiles in a lighter or darker colour.

At the same time I painted the small out-building in a range of browns in the same way that the original Blood Bath at Orcs drift card house was printed.

The main door was painted in a bleached grey colour.


Tony

Friday, 26 February 2016

For Sale on e-bay


My clear-out of the attic continues. This time a three book set of Gunfight wargame rules called Once Upon A Time in The West from Ian. S. Beck and John. D. Spencer.

Published by Tabletop Games, Nottingham back in 1978


And this Mechanical Lab Kit or construction toy. which still has many of its contents in the original packaging and boxes. I'm not sure it has ever been used.


For full details see the e-bay listings;
Once Upon A Time In The West
and Mechanical Lab Kit

Tony

Wednesday, 24 February 2016

Oldehammer Building no. 2 - part four


The latest update - the surface texturing. I have used a mixture of uPVA glue, textured paste (artists use it to thicken and add body to acrylic paints), fine sand and ready mixed filler to paint on a protective and textured coating to the model. I find that this texturing gives the model a better surface finish, adding interest to the plain card detail as well as giving the card a stronger and longer lasting surface finish.

I have used a large, soft bristled brush and watered-down the mix with water to which I have added a tiny drop of washing-up liquid. The plain white-washed base also helps with painting.


The next couple of steps will show how this simple card building was painted.

Tony

Sunday, 21 February 2016

Oldehammer Building No. 2 - part three


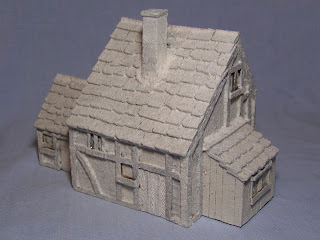
The roof was clad with card tiles - slightly thinner card than used on building No. 1 but added in exactly the same way; individual card tiles first chipped and weathered and then glued in place with uPVA glue.

The capping stones have been further detailed with sections of wooden cocktail sticks, glued in place with superglue.


The next update with show how I have textured the surface.

Tony

Friday, 19 February 2016

Oldehammer Building No. 2 - part two


Following on from the earlier post - the timber framing has been modelled from card (backing card from a sketch pad) and glued in place with uPVA glue. I have tried to copy the timber framing from the card building in Blood Bath oat Orcs Drift but as I was working from internet images, I'm not sure it is an exact copy.


The small wooden out building has had the upright wooded cladding modelled from cereal pack card again glued in place with uPVA glue.

I am well aware that these techniques are not breaking any new ground - if fact they are looking back to some of the earliest Warhammer buildings I ever made, they are however great fun to build and paint and as such are well worth attempting.

Tony

Tuesday, 16 February 2016

Oldehammer Building No. 2 - part one


Building No 2 - The Town House from Blood Bath at Orcs Drift was built alongside the first building (see earlier posts) and used construction techniques that are very similar to those already detailed in earlier posts.

The building was constructed from spare (ex-advertising sign) foamboard with the edges strengthened with strips of newspaper. I used my hot glue gun for the initial construction and uPVA glue for the newspaper strips.


I was lucky enough to find an image of this building on the internet and as it was photographed on a self-healing cutting board (with a 1cms square grid) I was able to re-construct the building on graph paper prior to building it. If you are using foam board - remember to make allowances for the thickness of the foamboard - in this case 5mm.


The foamboard core and strip newspaper strengthening produces a very strong box - ideal as the basis of  a simple wargame building. More to follow.

Tony

Sunday, 14 February 2016

Oldehammer Building No. 1 - part four


The first building finished. The most time consuming part was painting the timber frame. I used watered-down Chaos Black with some Beastial Brown added (to reduce the starkness of pure black) and with a No. 2 Rosemary and Co. brush painted each of the wooden frames. There is no quick way of doing this - you just have to take each post and paint it to the best you can.

There is some detail painting but not much and I have found these simple naive and early Warhammer or Citadel themed building to be just the tonic I needed.

My Mojo is back!

For details of the earlier construction, texturing and base painting please see earlier posts.


Building No. 2 to follow soon.

Tony

Friday, 12 February 2016

Oldehammer Building No. 1 - part three


The roof was the first thing I painted. I wanted to follow the Games Workshop card building colours as close as possible and went with an ochre tile or roof colour.

The colour has been built up over a mid-brown base by drybrushing with lighter colours and 'washing' with darker washes. As you can see I have picked out the odd tile with a grey-green colour and then more drybrushing.


The drybrushing has picked up on the earlier texturing.


Next it was on to the white-washed walls which I painted White!

The white was built up over a pale ivory colour with Titanium White tube acrylic paint painted on to the centre of the wall sections.


The model was great fun to build and even more fun to paint.

More to come - very soon. For more detail please see earlier posts.

Tony

Sunday, 7 February 2016

A Special Anniversary Competition Draw


Later this month, this Blog celebrates its Eight Anniversary and to mark the event I will be holding a Prize Draw for one of each of the Dampfpanzerwagon Guides. Building Wargame Terrain (the very last copy) and More Wargame Terrain. The winner will receive a signed copy of both books.


To enter the draw, all you have to do is comment on an article or post during this calendar month - it's that simple. I will make the draw on the 28th February and the lucky winner will then receive an e-mail informing him.

Good luck. Remember this is the very last copy of Dampfpanzerwagon guide No.1 Building Wargame Terrain. A true collectors item.

Tony

Friday, 5 February 2016

Oldehammer Building No.1 - part two


Part two - The Texturing.

I mixed up some uPVA glue, ready-mixed filler and fine sand and applied it to the whole of the model with a large brush. The texturing coat acts as a sealing layer as well a adding interest to the simple structure.


Once the initial texturing had dried, I used DAS modelling clay to 'tidy up' the rather 'soft' detail. The windows have been decorated with some plastic coated packing material (green mesh) and the door has been sculpted from DAS.


The next update will show how I painted this model.

For details of part one - please go to this link.

Tony

Wednesday, 3 February 2016

The Master's House, Ledbury


Earlier this week, Sue and I visited Ledbury, Worcestershire and spent time walking around and through the newly refurbished Master's House which now acts as the local library. It has been some time since we last visited and the transformation is spectacular and well worth a visit if you are in the area. For full details of the project, go to this link.


Further details can be found here.

Tony

Monday, 1 February 2016

Oldehammer Building No.1 - part one


As I have already stated in my earlier post, this is a project that I have wanted to work on for some time.

Oldehammer Building number one - The Construction.

Image Two - Shows the Games Workshop card building from Bloodbath at Orcs Drift - the inspiration for this model. I have not used the original card model, but have built a completely new 3D version from foamboard and scrap card.


Image Three - The core was constructed from some spare foamboard and thin card (the backing card of an A4 note pad) with the corners strengthened with strips of newspaper. Construction was done with uPVA glue with the edges re-enforced with dressmakers pins. Anyone familiar with early Games Workshop/White Dwarf construction articles will know what I mean.


Image Four - The wooden beams were again constructed from scrap card. I used 2.5mm thick backing card from an artists sketch pad. Once again the construction was carried out with uPVA glue.


Image Five - The foamboard core and newspaper strips make quite a strong core box, but I have also added foamboard strips to the interior to make sure that this model maintains it's shape and lasts.


Image Six - The roof tiles were cut from some card that I found in the garage. I believe it was the backing card from some picture frames. I have added each roof tile individually and made sure that the edges have been weathered by trimming small chips from the exposed edges. A time consuming process, but well worth it.


The chimney was two thin strips of foamboard wrapped in newspaper with a small square of card on top.

The next stage is texturing.

Tony