Sunday, 29 January 2017

BS2017 - Hammerhead Shark - part sixteen


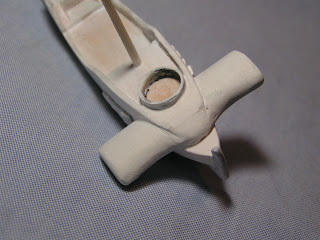
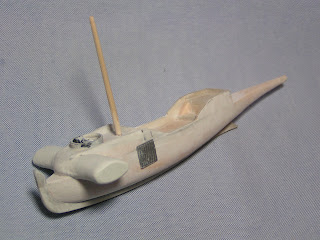
The construction is finished.

I have added two deck mounted guns, one on the fore deck and one to the stern. These were constructed from plastic card and plastic rod with sections of knitting needles as bases (the red discs).


The model is 140mm long, 54mm across the head and eyes, 25mm wide across the main hull and 48mm across the pectoral fins. It is 86mm tall, bottom of pectoral fin to top of mast and it weighs just 18g.

I would expect this to be the last set of images posted for now as the rules state that this is a Build Something Contest and not a Paint Something Contest.

But there may just be one more! An undercoated shot.


I estimate that there are well over 120 separate pieces to the model.

Tony

Saturday, 28 January 2017

BS2017 - Hammerhead Shark - part fifteen


The model, at long last is nearing completion. The Pectoral and Pelvic fins were constructed from plastic card and after scraping and sanding to a slight aerofoil section, they were glued in place with superglue. I have built up the join from fin to hull with some more superglue and evened out any imperfections with more filler/uPVA glue.


I have used a number of Spelljammer images as inspiration for this particular model, taking points or parts from one and detail from another. Next will be the deck guns and then I can undercoat ready for painting.


Tony

Friday, 27 January 2017

BS2017 - Hammerhead Shark - part fourteen


Yesterday evening I added the main Dorsal Fin or sail which was constructed from .75mm thick plastic card. The method I used to add the sail was to cut out the sail section with a small upright addition to the bottom and then carve out a portion of the main mast so that the sail and this addition fitted into the mast running from the deck and up the lower part of the mast. The join was strengthened with superglue and accelerator as well as adding a ring of superglue around the mast where the sail attaches. I'm sure you can follow this when you look at the images. When the superglue had fully set, I used a scalpel to trim down the diameter of the lower mast.


I also have to admit to the first mishap of the project. I broke off the upper tail section at the join with the rear deck and this join then had to be reinforced with superglue and accelerator applied in layers. Once the supeglue was set, I sanded the join to get rid of some of the excess superglue and to smooth out the join.


I have also added some hull decoration - I used a thin strip of sticky-back plastic along the side of the hull.

I added another layer of the filler/uPVA glue, this time with some white acrylic paint added to the mix to both define and smooth out the hull contours. The same mix was used to smooth out the Hammerhead Sharks head and the join where the head meets the deck.


Progress is very slow as the cold weather has meant that visits to the shed-at-the-bottom-of-the-garden are limited. In addition I am trying to restrict working on the Hammerhead Shark as I have a second and more important project on the go at the same time. Call it Bad Planning.

Tony

Thursday, 26 January 2017

BS2017 - Hammerhead Shark - part thirteen


The latest post shows how I have added the viewing ports or galleries to either side of the rear hull. These were constructed from sections of pen barrels with plastic card bases and tops. They were glued in place with superglue and further detailed with sticky-back plastic.

Other detail included some scroll work on the hull sides and the distinctive Hammerhead Sharks eyes which were constructed from the tops of some round plastic rods.


Tony

Wednesday, 25 January 2017

BS2017 - Hammerhead Shark - part twelve


 The tail section was constructed from a single piece of .75mm plastic card which was cut and sanded to shape before being inserted into a grove in the tail section. Once the tail was in place I sealed the area with both Green Stuff and superglue.

I have added liquid superglue to the tail section to build-up an aerofoil section which I will further fill and sand later in the project.

Additional ventral fins were added to the tail section, modelled from plastic card and glued in place with superglue.


During planning for this model I came across these Shark Aircraft which I thought were worth sharing with the group.

For full details go to this link.


Tony

Monday, 23 January 2017

BS2017 - Hammerhead Shark - part eleven


In this daily update, I have added five gun ports to each side of the main hull. I was planning four a side, but thought that five fitted better. There are also some deck details which like the gun ports were modelled with various thicknesses of card.

I estimate that there are over 60 separate or individual pieces used so far and construction is only about 60% finished.


Tony

Sunday, 22 January 2017

BS2017 - Hammerhead Shark - part ten


Now that the hull has been modelled it is now time to start adding the detail and in particular the Aeronef themed detailing. My plan is to add a fore and aft gun on a round bases and four gun openings to each side of the hull. Remember this is supposed to be an Aeronef flying ship and not the more primitive Spelljammer ship with catapults and Ballista.

The finished Aeronef will feature alongside my Squidship, Lilith as featured in this earlier post and will crewed by Martians.

Once the freezing cold weather relents, I'll get back down the shed and start modelling these fine details.

Tony

Saturday, 21 January 2017

BS2017 - Hammerhead Shark - part nine


I decided to remove the modern plastic vents or gills from the hull sides and replace them with sculpted or modelled plastic card gills. The vents were removed by placing a scalpel blade between the vents and the hull and twisting the blade - this did cause some damage, but this was quickly repaired with filler. I cut a strip of 4mm thick plastic card into a tapered or sharp triangle section and then sanded the cut edges smooth. Once I was happy with the profile I glued four gills to each side of the forward hull with superglue. When the glue was fully set, I used a scalpel and sanding sticks to refine the shape. I think the sculpted gills look better than the earlier grey plastic ones.


The hammerhead shark head was further detailed by sanding and the addition of more filler. I was very aware that this particular feature could make-or-break this particular build, So time spent getting it right was in my opinion time well spent.


Tony

Friday, 20 January 2017

BS2017 - Hammerhead Shark - part eight


At long last - the main mast has been fitted. I tapered a cocktail stick by sanding it with a sanding stick and glued it into a 1mm hole into the fore-deck.

The model is 154mm long, 50mm wide (across the head), 25mm wide (across the hull) and 75mm tall (to the top of the mast).

Once again, the hull has been painted with a filler and uPVA glue mix then sanded with fine abrasive pads to smooth out the small imperfections.

Tony

Thursday, 19 January 2017

BS2017 - Hammerhead Shark - part seven


The latest update shows the card keel that was added to the model. The keel was built from three separate pieces of 1mm thick card - it was easier to cut the profile in three parts rather than try to cut it out in one.

The main piece runs from the bow, level with the deck to about 3/4 of the way under the hull, The rear section is about 10mm long and ends in the Anal Fin and the small addition to the very front is just 5mm tall.

All of the individual parts were coated in superglue before being cut and sanded to shape. As you can see the small addition to the bow has still to be sanded back (to reduce the gloss finish of the superglue). Any gaps were filled with the filler/uPVA glue mix.

The Hammerhead Shark head has also been coated with the filler/uPVA glue mix and then sanded smooth.


Tony

Wednesday, 18 January 2017

Military Modelcraft International - January 2006


Regular readers and followers will already know that I enjoy reading various model making magazines; be they model air-plane, model boats, military or railway subjects. I can rarely abstain from picking up magazines with interesting articles or those found for bargain prices in charity shops.

I bought four second-hand issues of Military Modelcraft from e-bay and took them with me when Sue and I visited a Spa Hotel yesterday. The issue from January 2006 had, what is in my opinion one of the very best step-by-step construction and painting articles I had read for some time. So good, in fact that I re-read it just to make sure I was not over-stating it.

BT - 7 Light Tank Under New Management by Simon Barrett 

The four page article was a mix of background information, detailed step-by-step construction notes and interesting painting techniques which were inter-spaced with new to me hints and tips. In summary, just what I like when reading model making articles.....

I would be interested to know if any one else has had a similar experience.

The four magazines were bought for £3.00 with the knowledge that some pages had been removed, even so I consider them to be a bargain. I have decided to remove this particular article and keep it in a separate folder to use as inspiration when I write articles for magazines.


I will be looking out for other articles written by Simon Barrett.

Tony

Tuesday, 17 January 2017

BS2017 - Hammerhead Shark - part six


The latest update; and at long last the Hammerhead Sharks head has been modelled.

I have used some scrap Green Foam to model the simple aerofoil section and then, when I was happy with the shape I cut it in half and glued one half to each side of the hull. The shape was refined once the glue was fully set, by sanding with some fine sanding sticks and pads. The upper nose section has been filled with DAS modelling clay and I would expect this to be further detailed once fully hardened.

The gills are sections of plastic floor sections from the Airfix Sci-Fi platform kit. They were cut out with a razorsaw, before being thinned and glued in place with superglue.

The model is 150mm long, 50mm wide (across the head) or 25mm wide (across the hull) and 26mm deep at the central hull.

Tony

Monday, 16 January 2017

BS2017 - Hammerhead Shark - part five


The deck and hull sides continue to get attention. The forward section now has a gun redoubt that will house a cannon on a swivel base. This was built from a section of Biro barrel. Once again the other parts were card glued in place with superglue and then filled with fine filler and uPVA glue before being sanded smooth.


Tony

Sunday, 15 January 2017

BS2017 - Hammerhead Shark - part four


The upper hull sides have been modelled from card. I find that card bends and conforms to the curved hull sides better than plastic card. I used superglue to glue these parts into place and then filled any gaps with a filler/uPVA glue mix. Once the filler was fully set, I sanded the sides with both a sanding stick and sanding pads.


The small sets of steps towards the rear of the main deck are just triangles of Pink Foam glued in place with superglue. With every addition of filler and then sanding, the hull sides and hull shape is further refined.

Tony

Saturday, 14 January 2017

BS2017 - Hammerhead Shark -part three


I have spent most of the evening tidying up the basic hull shape, adding card profiles and filling gaps. At this stage I am still playing around with the design, adding bits here and sanding bits there. I think it is getting close to the stage where I can start adding details.


More to follow.

Tony

Friday, 13 January 2017

Kickstarter - Oldhammer Stone Bridge


This is an image of the very first resin cast of a Stone Bridge that will be part of a planned Kickstarter campaign due later this year. The Kickstarter will feature over a dozen themed models sculpted by me, cast by Hysterical Games and available from Apocalypse Miniatures. For details see this link.

I was given this model when I met up with Rob earlier this week and Ryan at Apocalypse Miniatures has given me permission to feature the model on this Blog.


The final two images show the master prior to being moulded and cast. It is 210mm long, 100mm wide and 55mm tall. The narrowest part of the upper roadway (at the bow or top of the bridge) is 37mm wide.


Further details of this Kickstarter will be made available closer to the launch date, but I will try to offer teasers or previews over the next couple of months.

It is my hope that the full collection will be made available with the first launch. Stay tuned for further details and good luck to Ryan with this adventure.

Tony

Thursday, 12 January 2017

Build Something 2017 - Hammerhead Shark part two


At long last, construction started.....

The hull is being constructed out of Pink Foam, as you can see in the images above I have used five different pieces to construct the hull. The individual parts were cut from foam with a jigsaw, glued together with superglue and then trimmed and sanded to shape.

I then used both sanding sticks and sanding pads to refine the shape before filling any holes with a filler, uPVA glue mix.


Obviously there is still a long way to go, but so far, I'm happy with the progress.

Tony

Wednesday, 11 January 2017

Commando Comic No. 4843 - Peterloo!


My latest Comando Comic is Peterloo! another of the Napoleonic themed issues to celebrate the 200 year anniversary of Waterloo. Regular readers and followers will know that I have quite a collection of similar issues, for details see this earlier post.

This example was purchased from e-bay.

I enjoy reading these simple adventures, some of which have inspired Flintloque scenarios or short stories.

Tony

Sunday, 8 January 2017

Build Something 2017 - my Hammerhead Shark Aeronef


It may have escaped your attention but The Lead Adventure Forum is running another Build Something Contest. The theme is FLIGHT. I have decided to enter and my chosen project is this 1/300th scale Hammerhead Shark Aeronef based on these designs taken from the TSR Dungeons and Dragons supplement Spelljammer.

Full details of the competition can be found here.

My plan is to modernise the armaments, some fast firing breachloaders instead of the primitive catapults and larger hull side guns, but the design should be similar to the originals featured above and below.


I have sketched-out some simple plans which may or may not be modified. A full build record will be recorded on this Blog, but also on my Build Something board - details of which can be found here.


Stay tuned for further details.

Tony

Friday, 6 January 2017

Cold War Frontier - Banbury Museum Cold War Exhibition


Sue and I visited the Cold War Frontier exhibition at Banbury Museum earlier today. I was first made aware of this unique exhibit back in early 2016, and promised myself that I would get to see it. Yesterday while trawling the Internet I saw that the temporary exhibit was ending this Saturday, so it was an early start to get down the M40 to see this exhibition before it closed.

And how glad I was to have made the effort, it was a great couple of hours reading about the history of RAF Upper Heyford and the SAC commands that were based there during the Cold War.

I know that passing this information on, with just one day to go, might seem a little late, but honestly, it was a very interesting and informative day and I would hope that plans for a permanent exhibition see fruit.

Full details can be found here but I am not sure how long the information will remain 'live' for.


It was well worth the hour long journey down to Banbury, I just wish I had been able to pass the information on earlier and maybe had a second visit, to double-check all of the information.

Tony