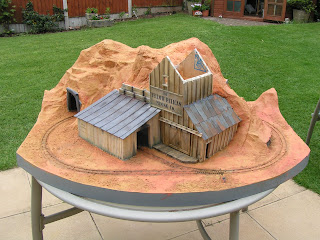
Monday, 27 June 2022

Yellow Pelican - An American style crew for the three narrow gauge locomotives


Since starting the Yellow Pelican narrow gauge layout I have been very conscious of one obvious anomaly.....

My sculpted and cast 1:27.7 scale figures are very British and don't look right on an American themed layout. American locomotive crew tend to have taller caps and thicker, heavier overalls when compared to the flat cap and thin denim of the UK crews. For example, see these two images below.


I decide to modify three of my resin figures and give them a more American style uniform. Using Milliput and Green Stuff as well as the odd 'cut-and-shut' I came up with these three fine fellows all of which have baggier and heavier denim overalls. I also 'beefed up the caps and even added a hat based on the image above to the left hand figure.

Undercoated in grey and then 'washed' the detail is more apparent.

Painting started with the flesh areas, then the linen shirts, before painting the overalls.

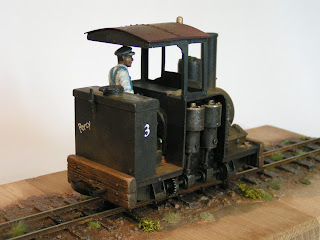
No. 3 - Percy with the newly painted and finished driver superglued in place.

No. 5 - Also with a new driver/engineer.

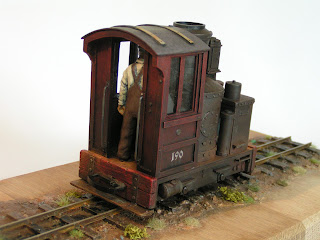
No. 190 - A new driver finished and based on another illustration found on the web. The new figure only just fits into the rear opening cab!

Finally, all three engines with the newly sculpted and painted engineers all ready for running on the layout.


Tony

Saturday, 25 June 2022

Yellow Pelican Mining Co. - Adding home made plants to the layout

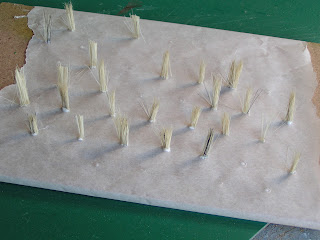
My next project was adding greenery and plants to the layout. I started with dried grasses and using this old pasting brush which I picked up some time ago, I cut clumps of grass which were glued to parchment paper with PVA glue.

Next, using this plastic Bonsai tree bought at Flying Tiger, I modelled some succulents. Tall plants I had seen while watching a film based in the South West of America.

The plastic stalks/leaves were bound with thin wire and then the trunks were built up with either hot glue or thread wrapped around the trunks before being painted.

Finally for now, I added more of the paper bases hanging basket material (see earlier posts). The original material is seen in the background (in the plastic bag), while the two pots in the foreground show the newly coloured ground cover which was modified with acrylic paint added to the pots and mixed with a wooden stick.


The home made plants were individually glued in place over PVA glue and sealed with a diluted mix of PVA washing-up liquid and water dripped via a pipette.


You can also see where I have started to add items of 'clutter' to the front of the layout. These items come from a wide variety of different sources, some of which I have already detailed in earlier posts.


Progress has been slower than I had planned, but the adding of the greenery has been therapeutic and a lot of fun. I'm sure that there will be more added in the coming weeks.

Tony

Friday, 24 June 2022

New Foam Cutter - a charity shop bargain

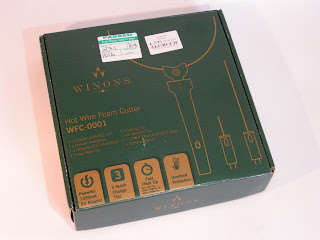
I picked up this boxed and tested Hot Wire Foam Cutter from a charity ship in Pershore, Worcestershire earlier this week - at just £2.99 I couldn't resist it.

I already have a similar red handled model, but can always keep this as a spare and I don't think this one has ever been used.


Tony

Thursday, 23 June 2022

Yellow Pelican Mining Co. - Completing the groundcover

Today's update shows the natural sandstone groundcover applied to the layout. For details of the natural sandstone ballast/scatter, see this earlier post. In addition, I have started to add some greenery, in this case a natural paper substitute used to decorate hanging baskets. I picked the hanging basket material up from a DIY store some years ago as I thought it would come in handy, and so it has.

The sandstone was applied over PVA glue and then sprayed with 'wet water' (water to which I have added some washing-up liquid). I had tried using 100% alcohol in the mix, but find that my tried and tested washing-up liquid works better. At least for me it does.

The green tufts have been coloured with simple acrylic paints to vary the intense blue/green colour of the original and then glue in place with PVA glue one at a time. The process in not yet finished as I want to add more and again vary the colour to add some variety.

I have tried to be restrained with the placement as I don't want a luscious and verdant covering, but do want some variety. In addition I have painted odd stones with grey acrylic paint - again to add some variety.

The final image was taken from the bedroom window, to give a better impression of the effect I was going for. For larger images, you can 'click' on the pictures.


Tony

Wednesday, 22 June 2022

Wargames Terrain & Building found in charity shop!


My brother-in-law thinks that I can call myself a real author after he found a copy of Wargames Terrain & Buildings for sale in a charity shop in Hastings.

It's certainly an interesting discovery.

Tony

Monday, 20 June 2022

Yellow Pelican Mining Co. - Using natural sandstone to add colour and texture to the layout

When I built my first narrow gauge railway layout many, many years ago I used real soil from the garden - dried and sieved to add a more natural ground cover effect. With The Yellow Pelican layout I wanted to do the same and searched for a suitable red soil material.

I have used real red sandstone, found in Kidderminster (a natural rock outcrop at the side of the road) as the basis of this mix (see rock to the upper left).

The rock was crushed with a hammer and then sieved with a variety of different sized sieves to produce three different sizes of natural red ground cover; a very fine almost powder mix, a small rock size and some larger random rocks as seen above.

In addition I did the same with cat litter (on the left) and a lump of clay soil found in my own garden (on the right) these would be added to the red sandstone to vary the intensity of the red soil and add some natural variety.

Using all three coloured mixes and varying the grades of the sieved stones, I had a soil colour palette with which I could proceed. (This image also shows two of the three sample pots, I used to paint the layout).


This first image of the painted layout shows part of a small test I did to the right hand side of the layout. In this image, the water tank and oil drums have been loosely placed on the layout to test various placement ideas. For details of how the water tank and oil drums were modelled and painted see earlier posts.
 

The final image shows how the legs of the water tank and oil drum support have been modified to fit the ground contours then glued in place and how the fine sieved sandstone has been added.

The sandstone was applied over slightly diluted PVA glue and then sealed with highly diluted PVA glue which has been 'wetted-down' by mixing in some washing up liquid and dripped on with a pipette.

Now that the sandstone has dried, you can see how it matches-in with the earlier painted and drybrushed ground cover colour. I now have the job of adding this sandstone/clay mix to the rest of the layout, but hopefully as the weather is forecast to be good over the next couple of days this should be done very soon.

Tony

Saturday, 18 June 2022

Yellow Pelican Mining Co. - Painting the Groundwork part three

In today's Blog post I show the narrow gauge railway layout after I have 'washed' the main rock and groundwork areas with a home-made dark wash then added subtle drybrushing across the top of the mountains to pick out some of the sculpted detail.

I have tried to keep the effects light as I can get a little carried away with my drybrushing. As you can see I have purposely painted over the track areas, these can be cleaned later.


I had not intended spending so much time on the layout, but great weather and prompts from the Grandson's means that I am trying to have a working and running layout before they visit in the Summer holidays.

Tony

Wednesday, 15 June 2022

Yellow Pelican Mining Co. - Painting The Groundwork part two

Continuing on from my last update, I have now basecoated the whole layout with household tester pots from B&Q. The colours were mixed up and small samples were produced on thick card before I took two to have them mixed in store. I have used a Ochre orange and a Sandstone red colour which were mixed on the model to produce a more natural variation.

As with the earlier post, I have used a large 2 inch brush for most of the painting, mixing in some water where necessary to make the paint 'flow' better and a smaller detailing brush where the rocks meet other painted detail. The fascia has been primed in a grey primer and sanded to remove any imperfections.


If you look closely you can see where I have mixed the ochre and red colours, leaving the red in the shadows and the pure ochre as a highlight.

Tony

Monday, 13 June 2022

The White Church - part two, Miniature Wargames 471

Miniature Wargames issue 471 (July 2022) has part two of my two part series showing how I painted and weathered a scratch built church for a game of The Silver Bayonet.

Last months article described how I built this model from cardboard and blue foam with a DAS modelling clay sculpted surface. In this months magazine, I show how I painted the White Church.

The model was based on a Greek church paper model that I found on the internet. For full details see the magazine which is now available for sale in W H Smiths.


Tony

Saturday, 11 June 2022

Yellow Pelican Mining Co. - Painting The Groundwork

I've been working on the new engine for the last couple of weeks and the progress can be found on earlier posts, but at the same time I have started painting the main layout. I have used household emulsion paint tester post which I had mixed up at B&Q for the main colours and applied the paint with both a large 2 inch brush and a smaller detailing brush to paint around the sculpted features. 

The first coat looks a little 'flat' but I will be both 'washing' and drybrushing over the top once the whole board is finished. The rear and board edging have been undercoated with a grey undercoat and once again this has been sanded back and re-painted prior to taking these photos.


Progress has been slow, but as this is a long-term, side project, I'm not too worried. I would hope that I could get trains running before the end of the Summer so the Grandchildren can see some movement.

Tony

Friday, 10 June 2022

Recent Charity Shop Finds

This week I have been lucky enough to pick up these two Charity Shop finds. The first is this book - British Steam Tugs by P. N. Thomas and first published by Waine Research in 1983. The copy I have is the second edition printed in 1997.

The book is mainly black and white illustrations of various vessels but does have some stunning colour illustrations - for example this owners colours page.

The book was bought in a charity shop in Kidderminster for just £2.00. There were other items obviously from the same donation, additional books and plans for similar boats, but I thought this book was the best value.

I've wanted to model a steam tug ever since I built the Airfix Great Western kit as a teenager. Just maybe these illustrations will be the push I've been looking for.

In addition I also picked up this Archimedes drill also for £2.00. At the time of purchasing it, it was stiff and not working properly, but a quick service with a fine wire brush and some oil has it back in full working order.

The new nine and a half inch model will supplement my existing seven inch Hobbies model which I have previously written about, for more details, see this post.


Tony