Wednesday 30 September 2020

A weekend project - part seven

Another post showing the finished ruined shrine gaming board, but this time I have added some of my 40mm Typhon or Greek Myth figures to give an idea of scale. In addition, I think the lighting is better. As detailed in earlier posts, this board was built using scrap materials that I had stored in the workshop or garage. I did not need to buy anything for the model and although it took way longer than the planned weekend - I like it.


 Tony

Monday 28 September 2020

Another Narrow Gauge Adventure - Narrow Gauge World issue 152

Issue 152 of Narrow Gauge World has an article written by me showing how I built this cute one truck Shay. The model was scratch-built to the unusual scale of 1:27.7 or 11mm = 1 foot which perfectly mimics 18 inch narrow gauge running on 16.5mm or HO-OO scale track, in this case Peco Crazy Track.

The model was built from various thicknesses of plastic card and runs on a modified Hornby 'Smokey-Joe' 0-4-0 HO-OO chassis.


The model locomotive was conceived and built to run on my latest narrow gauge railway layout, The Yellow Pelican Mining Co. Expect to see many more posts over the coming months, detailing how I planned the layout and how I built it. The whole idea for the layout was a joint effort between myself and the two junior engineers Charlie and Finley (my grandsons) who have been quite vocal about what they want to see on their model train set - for example; Engine No. 3 (the first engine built for the layout) was named by Charlie - it had to be called Percy!


Welcome to the Yellow Pelican Mining Co. model railway chronicles.

Tony

Sunday 27 September 2020

A weekend project - part six

The newest terrain board finished. I've glued on some ground foam greenery and static grass tufts while the olive trees which were built from some dried roots and more ground foam have been added to the side of the temple or shrine.

The sides of the board have been painted satin black and then varnished. The board is 560mm x 560mm.


I'll try to get some in-game images soon, but for now the board is finished.

Tony

Saturday 26 September 2020

A weekend project - part five


I varnished the board with some dilute Galleria matt varnish, which I sprayed through my airbrush as I thought it would protect the surface and give it some strength and then flocked the board with static grass applied over PVA glue in a random pattern.


The weekend project has lasted much longer than I had expected, but I have managed to stick to my goal of using materials that I had to hand and NOT purchase anything specifically for use on the board. I'll try to add some more decoration to the surface later today.

Tony

Friday 25 September 2020

A weekend project - part four


It's quite obvious that my planned weekend project has and is taking a lot longer than just a weekend!

Painting has continued with a light sand colour and drybrushing in the same colour with added Titanium White. I have also used my Paasche airbrush to add shadows and define the individual items or features on this skirmish board with a diluted light grey colour.


I'm happier with the result - the gaming board is looking so much better with the added surface detailing and a new coat of paint.

Hopefully, I can get more done this weekend (if the weather is OK).

Tony

Thursday 24 September 2020

For sale on E-bay

I have a number of items for sale on E-bay this week. For more details see this link.


Thank you.

Tony

Wednesday 23 September 2020

A weekend project - part three

The board was painted in a light brown/leather brown colour but.....

I wasn't too keen on the look and decided to add more terrain features. The statue was re-modelled and the main figure was removed and now shown as a destroyed statue with various pieces strewn on the ground. I also used DAS modelling clay to 'bed-in' more plaster ruins.

Here are a couple of images showing the changes.


I then added more sieved stones and fine sand to the surface which was glued in place with dilute PVA glue.

The final image for this post shows the ruined shrine with a couple of 40mm miniatures to give an idea of scale and the amount of ground cover texture.


This additional texturing work took about 2 hours.

Tony

Tuesday 22 September 2020

A weekend project - part two

The ruined shrine has been further detailed with plaster pillars that were cast some years ago and have been patiently waiting in my spares box for the right project, while the groundwork has been built-up with ready-mixed filler and Modelling Compound from Geek's Gaming.

In addition, I have added odd plaster castings of stones and broken pillars to the base and 'blended' them in with DAS modelling clay.

I use scrap blue foam to build a set of rough steps to the side and added a plastic statue on a scratch-built plinth to the front. The statue is a 54mm scale plastic figure that was bought from a charity store many years ago.


It should be pretty obvious that my 'pie-in-the-sky' plan for producing this simple board in one weekend has not been achieved, but I'll continue until it is complete. Modelling time so far is about 6 hours over a relaxed Saturday and Sunday in the garden.

Tony

Monday 21 September 2020

A weekend project

While tidying the garage, I came across this coffee table top. I'd already started work on the exposed edges, but this had long ago become one of those started but never finished projects. In fact I had started using it as a base for spray painting.

I thought it was time I did something with it

I grabbed a piece of expanded polystyrene and trimmed it to shape, then using some scrap wood, I lined the edges. At this time it was all very rough and ready - just scrap materials I had lying about, some glue and a couple of nails.

The polystyrene was covered with some paper mache and ready-mixed filler to which I had added both PVA glue and acrylic paint.

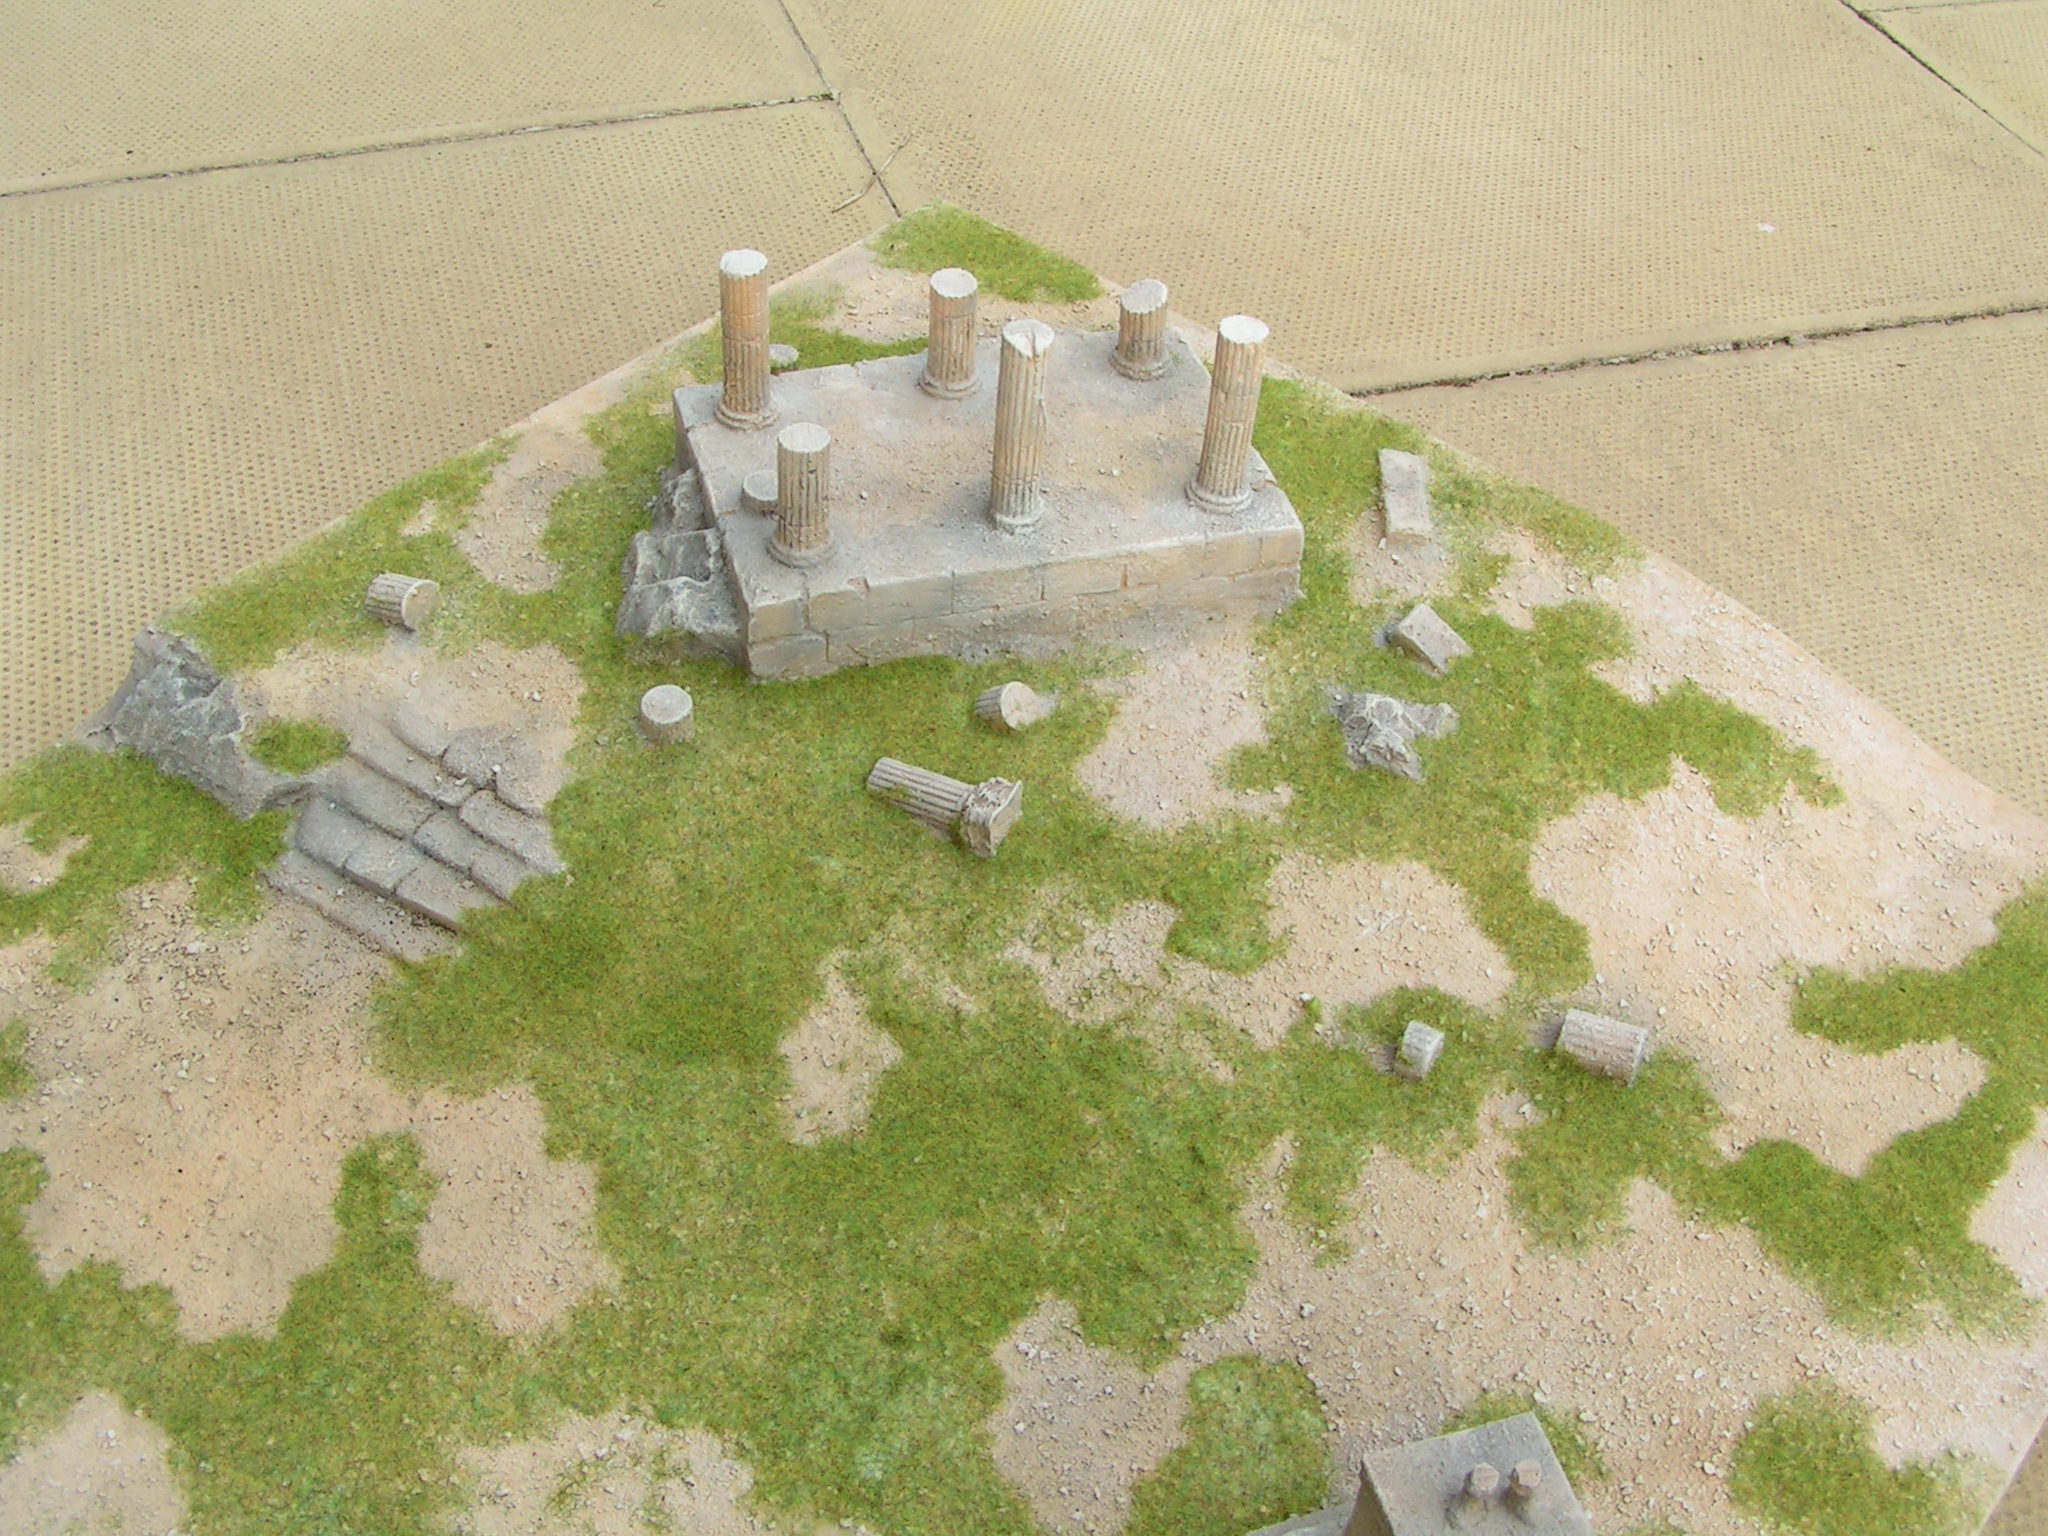
The temple base was built from an off cut of blue foam and plaster castings of cut stone that I had been given many years ago. I used my hot glue gun for most of the basis construction and set the temple base at an angle to give more interest to the composition.


So far ALL of t he materials used were lying about and spare. I thought it would be interesting if I could continue with this theme and see just how far I could go, building this display board using materials I had to hand.

Construction time so far - about three hours.

More updated to come.

Tony

Thursday 17 September 2020

September - Painting one mini at a time - part ten

In this update you can see how I have continued to add paint to this 40mm Spartan Miniatures Hero.

After painting the base and the shield I varnished the mini with both gloss and matt varnish before adding static grass decoration to the base.


Another metal miniature saved from the Lead Mountain and ready to add to my collection of painted Greek warriors. Stay safe and

Keep calm and Carry On Modelling

Tony

September - Painting one mini at a time - part nine

Another 40mm Spartan Miniatures model. This time one of the heroes. The model was mounted onto a pre-decimalisation penny and the groundwork was built up with Milliput epoxy putty. I then used some Vallejo modelling putty to hide seams and smooth out areas of the armour.

I have found that the Spartan Miniatures sculpts are of varing quality - the main group of modular Hoplites (body and lower legs as a one piece casting and then head and arms can be added) are better sculpts while the heroes, see above are more 'two dimensional' and can look very flat from certain angles.

The figure was undercoated with Tamiya spray primer and then basecoated with a black/brown base.

The metallic areas were painted first with a bright gold colour which was 'washed' to bring out the sheen and detail.


Then it was onto the flesh areas which were painted in my usual Barbarian Leather/Snakebite Leather base and highlighted in layers before being washed with a flesh wash. It has been great fun searching through my Lead Mountain and finally getting around to painting these metal miniatures.

I'll post more images and details later, but for now, stay safe and

Keep Calm and Carry On Modelling

Tony