Monday 27 April 2020

The Chapel at Rofenburg - part ten


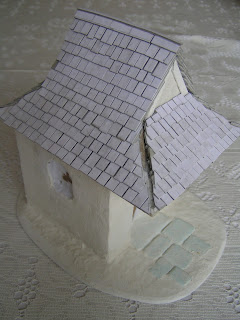
The spire was built in sections, from a cardboard and balsawood base with cocktail stick detailing for the roof section or bell tower structure and some Blue Foam covered in glossy paper for the main ‘witches hat’. 

Detailing was done with more gloss card and another cocktail stick. This was the third spire model I had constructed for this model. I just couldn’t get the shape and dimensions right. It really was a case of try and try and try again.....


The four main supports for the overhanging roof section were built from Balsawood cut into 7mm x 7mm strips before being trimmed to shape and glued in place with superglue. Another case of try and try again.

Further detailing was done with plastic card strips and plastic rod rivets glue in place with superglue.


The next post will show how I start the painting.

Stay safe

Keep Calm and Carry On Modelling

Tony

Saturday 25 April 2020

Flintloque Regiment Lowland Dwarves - finished


The final part.....

The standard was based on an image I found on the internet, it was first drawn onto a self adhesive label and then painted with acrylic paints. I folded the standard around the pole and trimmed it to fit before adding some folds and painted on highlights. Nothing too complicated, but now I can declare the regiment of Lowland Dwarves finished.

They have been great fun to modify and paint - I really should get around to painting more.


Stay safe

Keep Calm and Carry On Modelling

Tony

Friday 24 April 2020

Flintloque Regiment Lowland Dwarves - part twelve


The eight Flintloque Dwarves have been varnished first with a gloss varnish and then with Galleria Matt Varnish. I have added some static grass, static grass tufts and green ground foam to the finished bases. I just need to design and paint the standard and the Lowland Dwarves will be ready for the table.....


Look out for the final post very soon.

Stay safe

Keep Calm and Carry On Modelling

Tony

Wednesday 22 April 2020

Flintloque Regiment Lowland Dwarves - part eleven


The modified Lowland Dwarves are nearing completion. The guns and equipment have been painted and I have used various metallic paints to touch-in the Shako decoration and detailing. I started with a dark brown base and highlighted with Old Gold, then Shining Gold and finally a Shining Gold and silver mix to add the final dot highlights.

In addition the bases have been given another light wash to further define the groundwork. The standard bearer has received a new standard pole which was cut from a plastic skeleton miniature.


Not much more to come. We should see the finished Dwarves very soon.

Stay safe

Keep Calm and Carry On Modelling

Tony

Tuesday 21 April 2020

The Chapel at Rofenburg - part nine


The two side windows were first drawn on to some spare card and then cut out with a new scalpel blade. The card window frames were glued in place with a sheet of green weave fitted behind. The weave was packaging material from a fresh fruit carton.


The main doors were carved from a single piece of 3mm thick plastic card. I first cut out the joins, and then textured the wood with a scalpel and some coarse sandpaper. Additional detailing was done with slivers of plastic card and plastic rod. Both the windows and the doors were glued in place with superglue and the openings further refined and detailed with DAS modelling clay laid over PVA glue.


The groundwork was further textured with fine sand applied over dilute PVA glue.


Stay safe

Keep Calm and Carry On Modelling

Tony

Monday 20 April 2020

Sanding boards/Sanding sticks


Lockdown has meant I have much more free time than usual. I've spent a day tidying up the shed-at-the-bottom-of-the-garden and reorganising my workspace.

One of the changes I have made is to add some upturned wallpaper to my workbench - an idea that I first saw on a You Tube tutorial site. It allows me to have a new. clean work area at the change of a piece of paper.

I have also updated my sanding sheets (these are glass cutting boards with abrasive paper attached with double sided tape). I first removed the old sandpapers and cleaned the glass before adding fresh abrasive paper over double sided tape.

Image one

The new sanding plates and one sanding stick.


Image two

The largest on the cutting boards - actually a Brabantia glass cutting board - this one with two different sanding sheets attached to one cutting board.


Image two

Another glass cutting board - this one with 3M's abrasive paper 240 grit.


Image three

A glass shelf (a toughened glass shelf) with Tamiya fine abrasive paper also attached with double sided tape.


Image four and five

A wooden ruler with two different sand papers/abrasive papers attached, the lower image shows the reverse.


The sanding stick will be used like a file or emery board, the boards will be used to sand items smooth. I like to have a variety of different grits for different projects.

Stay safe

Keep Calm and Carry On Modelling

Tony

Saturday 18 April 2020

Flintloque Regiment Lowland Dwarves - part ten


At long last I have painted the Shako's. The design was based on the artwork seen in Flintloque Regiment Lowland Dwarves part one produced by Jodi Mest. I have used dark brown as a base and then highlighted with Bronze, Old Gold and then Shinning Gold to build up the distinctive head wear decoration. In addition I have highlighted the gold areas with just a tiny drop of gold/silver mix used as an extreme highlight.


The various backpacks and stored equipment have been painted.


Not much left to do now.....

Stay safe

Keep Calm and Carry On Modelling

Tony

Friday 17 April 2020

Flintloque Regiment Lowland Dwarves - part nine


I've enjoyed the challenge of painting up these Flintloque Dwarves and now the little project is nearing completion.

I was recently asked "Why eight miniatures, why not more?"

I'm not sure - I think that over the years eight has become my 'go-to' number of miniatures to work on in one sitting..... I know I have done more and less figures, but it always comes back to eight - in fact I would prefer to paint up two blocks of eight than a single batch of sixteen - strange I know but never-the-less a fact. I wonder if I am alone in this?


Back to the metal miniatures and as you can see the main change has been the beards. I decided to vary the colours and not have ALL the Dwarves with the same colour beard choice. In addition I have 'tidied-up' the Shako's and painted the backpacks, again in a variety of different colours.


Hopefully I can get these little heroes finished soon, very soon. In the meantime Stay safe.

Keep Calm and Carry On Modelling.

Tony

Thursday 16 April 2020

And what I'm reading


I am lucky enough to have some box folders in the attic which contain some early fantasy and gaming magazines. For example;

The complete run of Adventurer from Mersey Leisure Publishing. First published in the 1980's

and

Two issues of Red Giant published in 1990

They are now in the summerhouse and I'm sure I'll enjoy re-reading them.

Stay safe.

Tony

What I've been listening to


With no sport to listen to on the radio and most stations talking about Coronavirus I've reverted back to old school - listening on the Walkman.....

My Mother-in-Law still likes to listen to her cassette player and tucked away in her horde of not listened to cassettes were there three boxed sets from Bernard Cornwell;

The Winter King
Enemies of God and 
Excalibur

All three are part of the Arthur trilogy and I am already half way through book two - Enemies of God. They make a nice change from listening to daily updates, but I have to admit to them not being great stories - just something to pass the time. When I've finished these, I will have to go back and see what else she has in her supply.

Stay safe.

Tony

Wednesday 15 April 2020

The Chapel at Rofenburg - part eight


Today's post is showing how the roof was detailed. I have used some balswood for the half round caping tiles on the lower roof area. The balsawood was first cut and then sanded to a half round profile and then trimmed with a snap-off bladed knife to get the correct stagger. Once in place I used some DAS modelling clay to 'bed' the tiles in place.

I then used some PVA glue and ready-mixed filler to which I has added some fine sand (I use sand from the Sahara desert which was gifted to me by Pam who brought it back after visiting Egypt - the sand is extremely fine almost powder) to add some additional texture to the tiles. If like most you don't have Sahara sand - you can use fine sand or even talc.


Small sections of card were glued to some of the tiles to mimic the small lead holders that are sometimes used on slate or tiles roofs. In addition I have used small slivers of plastic card to add nail heads to the wooded roof supports on the ends of the half-hipped roof sections.


I like to go over-the-top when detailing my model roofs as this is the part of the model that you see most (looking down on) when gaming. I would always suggest that if you are going to detail only one part of your wargame terrain - detail the roof.

Stay safe

Keep Calm and Carry On Modelling

Tony

Tuesday 14 April 2020

Flintloque Regiment Lowland Dwarves - part eight


The big change is that I have now mounted the eight Flintloque Dwarves on to cork bases to ease handling. It is an interesting fact that although I own a number of specialist miniature holders (some very expensive and all complicated to use) I still prefer the 'Olde Skool' Bluetack and cork method! I think there is a lesson to be learnt there.....

The bases have been painted with a Snakebite Leather colour highlighted with Snakebite and white and the odd stone picked out in grey (mixed from black and white).


I have also painted the boots and shoes as well as started to paint the backpacks (sorry you can't see these).

With the bases painted I always think the miniatures look so much better - now it's just on to the detail painting.

Keep Safe

Keep Calm and Carry On Modelling

Tony

Monday 13 April 2020

Practical and Simple Wargame Terrain - part four


Miniature Wargames magazine issue 445 (May 2020) features yet another of my simple and practical wargame terrain tutorials - this fourth instalment the Thatched Cottage was inspired by an image I found in the Funchen book - Arms and Uniforms - the Napoleonic Wars part two. The model was built from corrugated cardboard, egg box card and £1.00 green scourers for the thatch.

As with the earlier three tutorials, I tried to stick to the following self imposed guidelines;

1 - The model should be constructed from simply sourced or everyday materials.

2 - The model should be generic and able to be used in a wide variety of different games or genres.

3 - The model should be robust enough for wargame club use.

4 - The model should be finished to a good standard and resemble the building it represents.

5 - Finally, it should fit into a 6 inch x 6 inch x 6 inch box - for easy storage.

For full details see the Warners Group Publications site.


As stated earlier, this is the fourth in my series of builds, and I have included images of the three earlier articles/models.


Finally for this post, I have a plea. I know that during these difficult times newsagents and in particular magazines will be loosing out on sales, due to lower footfall, but if we want to save these publications I suggest that the best way forward maybe direct subscriptions or E-editions. Both will help secure these magazines for the future and give you a bit of relief from our self-imposed isolation. If you can, please check out subscribing. I know that when my own paper editions of these wargame magazines arrive through the post they bring with them a little light relief.

Stay safe

Keep Calm and Carry On Modelling

Tony

Sunday 12 April 2020

The Chapel at Rofenburg - part seven


The individual tiles were cut from an old cardboard shoe box. Each tile is 6mm wide x 20mm long and they were glued in place one-by-one with PVA glue. It's a boring job but I am yet to find a better method of tiling roofs. I would recommend doing what I do and cut out more tiles than you require before starting then settle down to watch something on TV while you tile the roof.


You should also be able to see where I have added formers or rafters to the ends of the half-hipped roof form before tiling the upper section. The roof ridge was modelled from the same white cardboard.


At this stage - the roof in NOT attached to the chapel.


There is still a lot to do to the roof, but for now I am pleased with the outcome.

Happy Easter and stay safe.

Keep Calm and Carry On Modelling

Tony

Saturday 11 April 2020

Flintloque Regiment Lowland Dwarves - part seven


Another quick update. I have started to paint the uniform decorations, particularly the shoulder epalettes. The old gold colour was painted over a brown base with both Games Workshop and Vallejo metallic colours.


Stay safe

Keep Calm and Carry On Modelling

Tony

Thursday 9 April 2020

Flintloque Regiment Lowland Dwarves - part six


More painting.....

I used a colour called Fester Blue (Coat d'arms 166) for the basic uniform blue, highlighted with the same colour and some white. I rarely highlight blue more than a single highlight as I find you can 'wash' the colour out if you use too many highlights.


The cuffs and turnbacks were painted with Suntanned Flesh (Coat d'arms 214) highlighted with Hot Orange (Vallejo) and then washed with a red ink.

In the image below, I have tidied-up the dark brown base colour, you can see this best around the cuff buttons and guns.


Now that I have started painting these modified Alternative Armies Dwarves, I have rekindled my love of these 'chunky' and cartoon-like miniatures. They really are great fun to paint. The perfect antidote in these trying times.

Stay safe

Keep Calm and Carry On Modelling

Tony