Saturday 30 June 2012

The Long and the Short of it

Huzzah, Huzzah and double Bang On. Craig Andrews at Barking Irons Online has uploaded part two of the three part Deadloque inspired short story and gaming scenario entitled 'The Long and the Short of it.' For full details go to this link. Part One called 'Getting Ahead' was published back in October 2011 and saw the introduction of a new character - Commissar Margahrah and his loyal group of Ferach Militia. The first short story and initial scenario can be found here.

In addition a separate modelling article featuring details of how I converted a group of eight standard Flintloque miniatures in to Headless Zombies can be found here.

Let us hope that part three - the conclusion will not take as long to be published.


The original inspiration was taken from a book on English Folk tales and was intended as a short story for The White Liar series - also featuring on Barking Irons Online. As the story grew, I knew that it deserved to be extended and turned into a set of linked gaming scenarios. Craig Andrews (editor of BIO) has waved his magic wand over my scribblings and notes to produce this second story and scenario - thank you Craig.

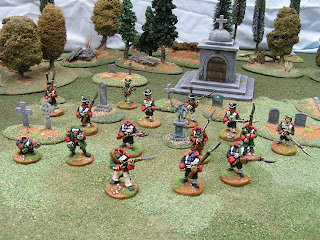
The composed image of both 'normal' zombies and the headless variety above was taken last month to illustrate this story. It shows Witchland zombies emerging from a small graveyard.

I know that part one (Getting Ahead) caused some considerable interest here on this Blog. I hope that you enjoy part two just as much.

Tony
Wednesday 27 June 2012

2o Bellalugosi Line - Mama Mia, is-a fine regiment of-a Toads!

The Pledge for June is Finito (properly finito) based, varnished and flocked. 

Photo One - "Just for Gavin" - an in-game shot of the dashingly dressed Todoroni unit, 2o Bellalugosi Line from Alternative Armies 56505 taking some refreshment from a local well during a lull in the battle. (Something that happens quite often with this regiment).


Photo Two - The command group of Officer, Standard Bearer and Kermit.


Photo Two - Three of the nine finished troopers.


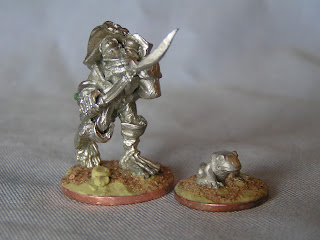
Photo Three - All nine troopers mounted on to 2p coins and Kermit (from GW) who is mounted on to a 1p coin.

The groundwork was painted GW Snakebite Leather, then highlighted with Snakebite/Skull White and washed with Badab Black from GW. When fully dry some of the larger stones were painted with a Chaos Black/Skull White mix.

The miniatures were first varnished with Ronseal Gloss Varnish and then two coats of Galleria Matt Varnish. The flocking was added over spots of uPVA glue.


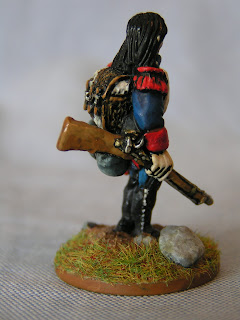
Photo Four - A close up of the Standard Bearer with hand painted, custom flag. I am particularly pleased with this miniature who is just full of character.


Finally, I have added the eyes - small dots of Chaos Black which were then gloss varnished.

This is the first Todaroni Regiment I have painted and they were great fun to paint, so much so that I might just do a second one.

Tony

Tuesday 26 June 2012

Headless Zombies!

Craig Andrews of Barking Irons Online has promised to publish part two of the Flintloque story/scenario Getting Ahead this Friday, part one (which was originally published for Halloween 2011) can be found here. In the meantime I have written this short modelling article detailing how I converted some Flintloque miniatures into Headless Zombies. The full article can be found here.

I am looking forward to seeing the second part of this unusual gaming scenario in print and will update this Blog once I have more information.

Photos One and Two - Show the eight converted miniatures painted and based.


The original idea came about in early 2011 and although it has since been split into three shorter stories/scenarios, it has been patiently waiting to be published since then. I hope you enjoy them.

Tony

Monday 25 June 2012

2oBellalogosi Line - Finito!

Actually, not completely finished as I still need to paint the bases, varnish and flock, but at this stage the main painting is done.  I have also included an image of the hand-painted flag which was firsts sketched in pencil and then painted with standard acrylics on a sticky-backed postal label.

Photo One - The command group, officer, standard bearer and Kermit.


Photo Two - The troopers, or at least some of them.


Photo Three - The standard or regimental flag. Inspired by some images I found on the internet and painted with standard acrylic paints.


I have still to decide on what type of eyes I am going to go with - slits or dots?

Tony

Friday 22 June 2012

2o Bellalugosi Line - Haute Couture!

 The main uniform colours have now been decided upon for The 2o Bellalugosi Todaroni - The Pledge. I would like to say that I did loads of research and scanned through hundreds of Napoleonic uniform guides - actually I painted the uniforms white because I like the colour and contrast it gives against the Black undercoat!

Photos One to Four - The White uniform areas have been painted with GW Skull White over a layer of Vallejo Stonewall Grey allowing both Black and Stonewall Grey to show through in the shadows.

The eyes have been painted GW Badmoon Yellow and when dry, washed with GW Red wash. Both the colour and technique were unashamedly stolen from the Rob Alderman article in issue 2 of 60 Bloody Rounds. See earlier posts for more details.


Photos Five to Seven - More uniform painting. I wanted a Crimson Collar and Cuff colour and choose GW Red Gore as the base, highlighting with Red Gore and Bloody Red, but never actually using Bloody Red on its own.

Regular followers/readers will know that I enjoy using strong primary colours. particularly Bloody Red on my miniatures. In this case it took a considerable amount of will power not to paint a final highlight of Bloody Red.

At this stage there is a very strong Red-White-Green theme going on - very appropriate for the Italian based Todaroni.


Photos Eight to Ten - Some additional uniform painting. I have added a touch of blue to the feather on the officers bicorne, also highlighting the trim of the headgear with Gold. The rosettes on the bicornes have all been painted red-white-green and any Gold areas first painted with Dwarf Bronze, then Gold and finally Polished Gold to add highlights.

The pure Black areas have been highlighted with very Dark Grey, see Boots, Bicornes and shotte bags. At this stage I am still deciding how to paint the eyes - black dots or slits?


With most of the main painting finished, I expect the detail painting; flintloque, trim and bases to move along quickly. As usual, more to follow and very soon. On a personal note, I am very pleased with the crimson uniform detailing rather than my more usual Blood Red.

These Todaroni really are a very colourful unit - 'the very height of Napoleonique/Neapolitan high fashion.'

Tony
Wednesday 20 June 2012

2o Bellalugosi Line - Verte!

"What colour do you paint your Toads?"

"Why, green of course."

I have gone with the traditional Green Todaroni skin colour, but with a wide variation in hues. I have tried for dark green on the older Toads and light or even bright green on the younger ones.

In total I have used more than half-a-dozen pots of green paint, ranging from an almost black/green base on the officer to a bright pea-green on young Kermit. The full range includes; Foundry Forest Green 26A, Foundry Forest Green 26B, Miniature Paints Deep Bronze Green, Vallejo Model Color Gunship Green, Vallejo Model Color USA Uniform and Warzone Venetian Green.

All colours have been washed with either GW Green wash and/or Blue Wash, while some of the lighter areas have been highlighted with Badmoon Yellow and even some Skull White/Badmoon Yellow mix.

The Black areas have been 'touched-up' prior to taking these photos.


I think the contrast in hues is best seen with this pair of Toads; Dark Green on the trooper and Light Green on Kermit.


Having got the skin colours finished - I now have to decide on a uniform and facing colour, as usual more to follow.

Tony

Tuesday 19 June 2012
The-shed-at-the-bottom-of-the-garden

The plan was simple. Sue and I were going to drive to St. Johns, Worcester and have a snack lunch and short walk before coming home to watch the football. On the way into Worcester we passed Shed-r-Us the wooden out-house manufacturer of my shed at the bottom of the garden. 

"I'll just check if they have any spare panels and how much they cost?"

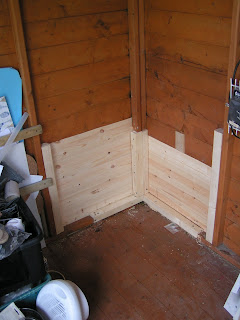
Five hours later and I've stripped the shed - there was some rot at the very back of the shed - the area where it fits into the corner of the garden, cut out the rot and fitted these new panels and uprights.  Total cost £16.00, but our day out has been cancelled and now I am looking forward to a relaxing bath to ease my aching back!

I cut out the rotten panels and both screwed and glued 2inch x 2inch wooden battens to the base and uprights. I then cut the lapboard planks and nailed them in place.  I should paint them with preservative, but I can't face that job right now.


Here is a close up of the repairs. As you can see there is some minor damage to the floor, but I am hoping that once it is painted it will last for another 13 years. Yes the shed/summerhouse has been in place for over 13 years. it was bought for me by my Wife and children for my 40th birthday.


Here is an image of the painting station to the front of the shed. Usually it is much more cluttered!


Normal service will be resumed shortly.

Tony

Sunday 17 June 2012

Blog response to Jameson Caine aka Shadow

Anyone else seen this YouTube Video?

I thought I would have a bit of fun and not being video enabled, I will have to do it the old fashioned way.

Question One;
How did you get started in the hobby?
I can never remember a time when I was not involved. My father, Uncle and Grandfather made models and there was always the smell of balsawood glue or plastic solvent in the house. Seriously, I can remember my father building balsawood models when I was younger than 10 and my Grandfather having a huge model railway set in his spare bedroom, then there is my Uncle John who still collects models and who used to build 1/72nd scale American Jets. He was so cool to a young teenager and used to lend me all his model books and magazines.

Question Two;
Gamer or Hobbyist?
Definitely a hobbyist. No question. No doubt - not even a little bit. Actually 5% Gamer vs. 95% Hobbyist.

Question Three;
My first model, assembled and painted?
I am sure there are earlier ones but three stand out. A whole box of early Airfix Sherman tanks and American half-tracks, painted green with badly applied transfers. Then a Revel 1/32nd scale Junkers Ju87 Stuka with a red and white snake down the side. Oh boy do I crave rebuilding this monster again. Finally a 54mm scale Airfix Highlander with intricate Black Watch tartan painted with Humbrol enamels.

Question Four;
My favourite paint?
As with question two - there is no hesitation it has to be Snakebite Leather from Games Workshop. I go through loads of this particular colour.

Question Five;
Rate myself as a painter 1 - to - 10.
I rate myself around 6 or 7, I know that I should be better, but I just love to paint and rush through this part of the hobby a little quickly.

Question Six;
My goals as a painter?
To get through my lead mountain. I have loads of unpainted models and just want to get them painted. I am attempting to achieve this with The Pledge, my goal to paint ten groups or regiments of miniatures before the end of the year.

Question Seven;
What does my Wife think of my hobby?
Hold on I'll ask.  Direct quote; "It's a nice relaxing and interesting hobby."

Question Eight;
Have I ever been ridiculed (with relation to the hobby)?
No. I think it is all about having the confidence to explain it properly.

Question Nine;
Have I ever thought about giving up the hobby?
Hell No.

Question Ten;
Is there a cuter gamer than Joey Warhammer?
Get a life! Seriously, what a stupid question and you were going so well up to then.

There you go. I hope that someone reads this and thinks that it is interesting - and sorry it's not a video response. Maybe one day.

Tony

Saturday 16 June 2012

2o Bellalugosi Line - Ribbit!

The Pledge part four. The nine AA Todoroni and one small GW frog have been undercoated Black. I have used a cheap (£1.00 a can) spray paint to cover most of the model, then touched up any bits I have missed with Chaos Black and a large paintbrush.  On this occasion, it might be that my eyesight is getting worse, I found it difficult to pick out the details on the models and have wet-brushed (like dry-brushed, but with more paint on the bristles) the figures with dark grey, concentrating on the heads and headgear, the shoulders and the main body. I think the photos show this better than words.

Photo One - The Command Group.


Photo two - The main troopers, well a small selection at least.


Photo Three - One trooper and Kermit. I think the dark grey (wet-brushed) undercoat shows up best on this image.


The big question on everyone's lips is "what colour is he going to paint the flesh?" The obvious is (Kermit) Green, but there are other options; Toad Brown, Royal Blue, Bright Yellow or even Orange!

Time to do some research and where better than with that Todaroni expert and Top-Toad Roberto Aldemano. In 60 Bloody Rounds, issue No. 2 from Summer 2008 there is a definitive paper written by Roberto called The Colours of Valon, Painting the Todoroni of Nepolise*. Toads that have Green skin and Yellow eyes.

For further information and some fantastic images of Roberto's Toad army check out this YouTube Showcase video It really is quite a treat and should inspire all of us to start collecting these fantastic Alternative Armies Todoroni.

So what colour will I paint my Toads? Sorry, you will have to wait until part five.

Tony

* I am not sure if this magazine is still available. It does not appear here.

Wednesday 13 June 2012

2o Bellalugosi Line - Croak!

The nine Todaroni from Alternative Armies are now based. I have used my usual 2p coins and built up the groundwork with standard Milliput. The bases have been further detailed with some sieved stones and fine sand which was laid over uPVA glue.

I have already commented that the miniatures needed very little tidying up, however (just because I like customising my figures) I have added Greenstuff buttons to each of the cuffs and some more to the uniform turnbacks. These were modelled with small beads of Greenstuff applied over a spot of superglue.

Photo One - Shows the main Todaroni troopers, based and ready to be undercoated.


Photo Two - The two command figures and a trooper, remember that the 'singer' was not included with this particular 'second-hand' set. (See earlier post).


Photo Three - There has been some comment on The Notables Yahoo Site about the fact that without the singer, "how could you keep up the morale of these troops?"  The answer is that this particular regiment has gone back to the 'gene pool' and enlisted the help of this young 'Kermit' a soprano.  Although very new to regimental life, Kermit is proving a winner with his colleagues and we have great hopes for him.

The frog model is from the Games Workshop Morgan Lefay Enchantress set (the one where she is sitting on a Unicorn) and in this instance is mounted on to a 1p coin as the 2p would have been a little large for this small single figure. The groundwork is once again built up with Milliput and detailed with sieved stones and sand.


In the next post, I will gives details of the undercoating and then the painting, proper. Stay tuned for more 'froggy goodies' and as usual, should you want to see larger images, just 'click' on them.

Tony

Monday 11 June 2012

Ekranoplans by Ken Duffy

This week The Aircraft Resource Centre (ARC) have a short article on modelling 1/144 scale Ekranoplans. for full details go to this web page and check out Thursday June 7th 2012. The article shows three Ekranoplans and 14M1P, a hybrid.

These Caspian Sea Monsters have always fascinated me, being a cross between a flying boat and a hovercraft. Check them out for a great read.


This particular image was take at Telford, The IPMS Scale Model World last year and shows the Alekseyev KM Ecranoplan.

Tony

Saturday 9 June 2012

A Single Elf Grenadier

Earlier this month I was chatting to a work colleague about the modelling projects I was working on and we got to compare miniature manufacturers. After a couple of minutes I started to speak about my Flintloque collection and Mike said that he had a couple of sets in the attic - some French!  The next day he brought in a box containing a full set of based and painted 1er Velite Grenadiers (5103).

I don't own that many Ferach (as regular readers will know) but I do have this single figure from the very same set. picked up second-hand some years ago. The figure is not totally unique, but does have some interesting features worth pointing out;
I tend to paint my Armorica Elves in a very pale skin colour with black hair and this is one of my more extreme painted Elves. Secondly the figure is based with DAS modelling clay as at the time I didn't have any Milliput to hand. The base has stood up well during this time and shows no signs of wear or damage.

With hindsight, I think the blue of the uniform is too light, too much Royal Blue rather than Dark Blue and the Red looks a little washed-out. Maybe one day I will get around to buying and painting a set of 1er Velite Grenadiers it will give me a set of Ferach to set my Orcs and Dwarves against!


Tony

Thursday 7 June 2012

Droitwich Spa Model Boat Club

Over the Queens Diamond Jubilee weekend I spent the day walking around Droitwich Spa town centre. The Vines Park Canal Trust were holding a small festival and the Droitwich Spa Model Boat Club were exhibiting a wide range of beautifully made model boats. Here are some of the photos.


I hope you like them.

Tony