Saturday 30 January 2010

Aeronef over the Aegean

Earlier this week I downloaded the 17 page Aeronef Scenario/Campaign Aeronef over the Aegean by Paul O'Grady and David Crook. I am not going to review the game Aeronef by Steve Blease as there are more than enough great reviews and comments on this Victorian Science Fiction (VSF) aerial combat game, however this new PDF booklet and Mini Campaign has only just been released.

Before I start, please note that you will need the the original rule book - Aeronef by Matthew Hartley and Steve Blease to run this campaign, for more details see;

The campaign booklet follows the revenge attacks of Baron Lantoz and his battle cruiser the Syren in a series of three linked scenarios, with battle damage being cumulative across the scenarios. In addition there is a very strong and intriguing 'back-story' which helps to give the campaign some 'gritty' realism, something that I felt worked very well.

I am yet to play any of the three scenarios, but enjoyed reading the story and notes on each of the scenarios. I will not give to much away, but will say that the writing and and quality of the scenarios allow the reader to fully sympathize with the hero (or the opposing forces). Very well done.

The booklet also contains some rules amendments, not all of which I agree with, but as I have said earlier - I am yet to play the games, so I will reserve judgement until I have tested them. Further sections give ship profiles of the main protagonists (plus, optional reinforcements) and details of the Brigade Models Aeronef miniatures that are available for this campaign, see;

The whole booklet is further enhanced with some quite stunning terrain and model photography, courtesy of Steve Blease. All in all a hearty recommendation - ten out of ten.

Tony

PS.
The cost of this PDF - $1.00 is being donated to the Doctors Without Borders - Haiti Earthquake Response appeal. $1.00 very well spent.
Wednesday 27 January 2010

January update

The Flintloque Building Set is now with Dave at Grand Manner and I would hope to see the finished resin castings within a week - to ten days. My next commission is a 28mm European Windmill and this is now 50% finished and once again should be fully finished within the week. Other modelling projects continue alongside these, but at a slower rate.

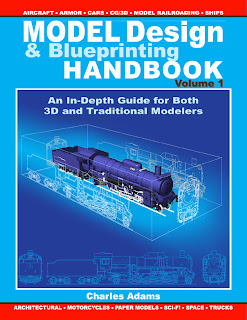
Earlier today I received an e-mail giving details of the second edition of this book; Model Design & Blueprinting Handbook volume 1. I bought the original book some time ago as a present for my son, who was at the time at university studying Computer and Web Page Design. However, on his return home he allowed me to have the book for my modelling projects.

In shorthand, the book is full of technical design articles about how to produce plans (blueprints) for models from photos or illustrations and hints and tips on reproducing models from these drawings. It has been very helpful when producing models from photos.

This book covers a very specialized subject and as such I would recommend it to scratch-build modellers or modellers who are looking to produce their own designs and drawings only.

For more details see;

On a separate note Steve Blease of Wessex Games has launched an Aeronef supplement called Aeronef over the Aegean, a mini campaign based on the revenge attacks of Baron Lantoz and his flagship the Syren.

The book is being offered at a nominal fee of $1.00 with all proceeds going to Doctors Without Borders - Haiti Earthquake Response. For further details see;
http://www.wargamevault.com/product_info.php?products_id=78217

2010 has started well with new modelling commissions and projects being delivered on time. I am aware that The Miniatures Page (TMP) will be running a couple of Workbench Articles very soon and Alternative Armies are planning on releasing a magazine that features an article or two of mine. I am sure that there will be loads more to fill the pages of this Blog in the next couple of months. I hope you enjoy them.

Tony

Monday 25 January 2010

Andreas Press

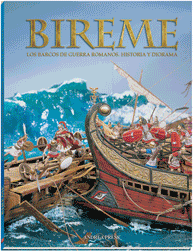
I was recently lucky enough to be lent two books from Andreas Press (Andreas Miniatures), the first is Bireme, a card-back book that details the development and history of the Roman Bireme warship and the building of a 1/32nd scale sea-scape diorama featuring a Roman Bireme ramming a Carthaginian warship.

For me this was a fantastic read, and pure 'eye candy', the book is full of information about these early warships and the section on modelling and painting the diorama is just fantastic. I would recommend this book to anyone interested in modelling, painting miniatures or scratch-building. Ten out of ten.

Please note the copy I was lent is the English edition and not the Spanish one as illustrated below.

The second Andreas Press book was even more 'jaw-dropping' a hard-backed book detailing the history and development of the German U-Boat called Das Boot.

Once again the pages are full of photographs and illustrations showing the history of submarines and the development of the different classes of German U-boats, then the second half details the building of a 1/32nd scale diorama featuring a Type VII C in dry-dock, being repaired and re-stocked for another tour of the Atlantic.

If the Bireme book interests you, then this one will really impress you, a diorama that features as its main part a huge 1/32nd scale U-Boat, but also features a dry dock, a section of French dockside, a railway, a mine store and even a scratch-built tug. Once again ten out of ten.

The book I was lent was the English edition and not the Spanish one featured in this illustration.

Full details are;
Bireme (2004) - from Andreas Press. ISBN 84-96527-13-1 and
Das Boot (2002) - from Andreas Press. ISBN 84-96527-03-4

Both books and others are available from a number of model book specialists, but can be seen on the official Andreas Miniatures site (catalogue/publications) at;

I have in my personal collection a number of Andreas Press books, each one a great read, full of beautiful illustrations and in most cases, step-by-step/work-in-progress shots.

Tony

Sunday 24 January 2010

Flintloque Buildings Set part twelve

As I come to the end of this particular project - I feel it would be worth repeating the reason behind this set. I wanted to produce a Flintloque themed set of terrain that could be cast in resin and sold via Grand Manner. The three buildings can be used either as individual buildings or combined as a single larger feature piece. In addition and following comments on this Blog plus personal e-mails I have also modeled a bell tower which can be used on the roof of the main building, adding even more variety and 'game-ability'.

It is also worth repeating that there is no official connection between these models, Grand Manner or myself with Alternative Armies, the producer of Flintloque/Slaughterloo.

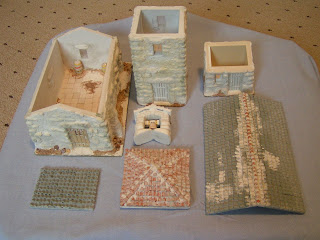
Photo One - Shows the completed 'masters' - the main building, tower and 'lean-to' out-building.

You will also notice that the bases of each building have been reduced to allow the three buildings to sit closer to one another with less of a gap between them (see earlier posts).

Photo Two - The finished Main Building with the separate bell tower.

Photo Three - A photo showing the internal detail of the main building, a tiled floor, plastered walls and barrels.

Photo Four - Detail of the main door and entrance. I wanted to model a more decorative and solid door.

Photo Five - All seven pieces, showing the three main buildings, the three removable roofs and the (new) bell tower.

The masters will be with Grand Manner next week and once I have a finished resin casting I will post a photo.

The Limited Edition, resin model sets should be available for early February and via this Blog, my personal e-mail at;
dampfpanzerwagon(at)yahoo.co.uk

or Grand Manner at;

The cost is £70.00 per set.

On a personal note, I wanted to thank all followers and personal e-mailers for the messages of support and orders. This has been a long-planned modelling project that I have wanted to produce for quite some time. Now that it is finished I am very pleased with the final result and even more pleased that it will be put into production as a resin set. I now look forward to painting a set (or two) and seeing the terrain on a Flintloque/Slaughterloo wargame table.

Once again - thank you for all the support during this project.

Tony

Thursday 21 January 2010

Watercolour painting - Mumbles

And now for something completely different! I occasionally dabble in watercolour painting, these two paintings are of Mumbles Head, near Swansea, South Wales. The subject matter is very close to my heart, having been born and brought up near to the sea and with this very striking headland always in view during my early years. In fact an Uncle and Aunt still live in Mumbles and my Mother and Father ran the St Anne's Hotel, Mumbles for some time.


Both images were copied from photographs of Mumbles that I took for a project my son was doing in university and I have painted them as an anniversary present for my Brother and Sister-in-Law. I will give one away and keep the second.

"I think I like the wooden framed version more that the one in the silver frame!" Both were painted on Winsor & Newton Cotman paper 14inch x 10inch and painted with a mixture of Winsor & Newton Cotman and WHS watercolour paints.

Tony

Tuesday 19 January 2010

Flintloque Buildings Set part eleven

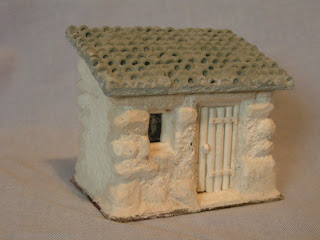
As mentioned in the earlier post - the Tower is now finished and these photos show the Outbuilding fully modelled. A simple, single storey 'lean-too' outhouse that can be used either as a stand-alone building or attached to one of the larger buildings such as the Tower.


This model has a 'foot print' of 75mm x 58mm and a maximum height of 65mm, although small, it is full of character and would make an ideal shed or store house.

The model has a lift-off roof with a plain interior, featuring a tiled floor. The door is cast shut, but can (with a little work) be modelled open or ajar.

This final photo shows the outhouse alongside the tower. As unmodified castings there is a slight gap between the walls, but (again with a little work) this can be reduced by sanding both castings and re-modelling them as one larger model.

As stated earlier in this series of Blog entries. I intend modelling two Flintloque Building Sets - one as three separate castings and a second as a fully integrated, larger single structure (see earlier illustrations).

Now that the two lesser buildings are completed, I will be concentrating on finishing the main building and the promised Bell Tower.

Tony

Monday 18 January 2010

Flintloque Buildings Set part ten

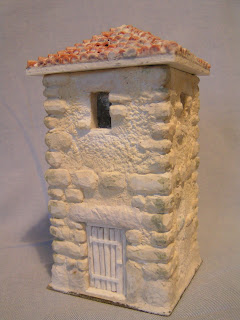
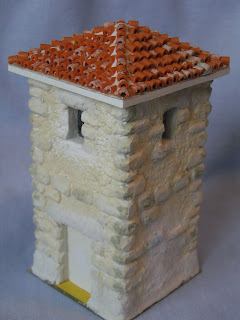
The Tower is now 99% finished. These four photos show in pictures more than I can ever write about the amount of detail and surface texture I have modelled.

The Main Building and Outhouse are nearing completion and finished photos of these and more detailed photos of the whole set will be available very soon.


The Tower features a lift-off roof and fully modelled upper floor, internally there is a wooden planked floor and a (non-opening) trap door. The ground floor has not be modelled.

In this photo you can see that the tiled roof section sits proud of the background surface - this is because there is a 6mm thick plug, which fits into the top of the tower.

I would expect that all three buildings will be with Grand Manner for casting by the end of this week. I will keep updating progress here on the Blog.

I am very pleased with the progress of this particular project and feel that I have firstly captured in this model the 'Flintloque style', so obvious in the range of miniatures from Alternative Armies, secondly - I believe that this model has improved my modelling or sculpting skills. I now look forward to seeing it cast, painted and featuring on battlefields all across Valon.

Tony

PS.
There is no reason why this terrain piece could not be used with other gaming genres, - 40mm Peninsular Wars, Pirates or Musketeers!

Saturday 16 January 2010

Ming's Weather Disruptor Generator

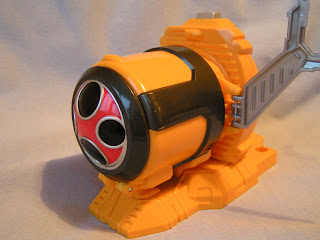
This particular plastic toy was a recent charity shop find. I have no idea who manufactured it or what game or toy licence it is from as there are no markings...

...But I do know that it bears an uncanny resemblance to Ming's latest weapon of mass destruction, a Weather Disruptor Generator.

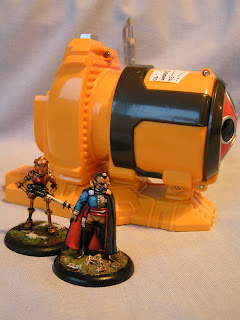
Here you can see The Great Emperor Ming, accompanied by one of his robot troopers visiting the secret underground construction site where the various components are being designed and built. It will not be long before operational tests will be conducted. "Which unsuspecting Mongo Princedom will he choose to target with this devastating new weapon?"

The Ming figure is a 40mm Graven Images figure, the robot is a modified casting from Hydra.

Tony

Thursday 14 January 2010

My 50th Follower - thank you

Today is a landmark of sorts - my 50th Follower has joined my Blog.

Thank you to all who follow and read this Blog, I really do appreciate it and those that comment, either directly to the Blog, via Yahoo Groups or in personal e-mails make a big difference.

When I set the Blog up nearly two years ago it was in part due to frustration at trying to manage a free website host, which I was finding very difficult to either access or update. Dampf's Modelling Page was in fact initially set up on a whim and much to the annoyance of my son.

Since then and many posts later, I find that the Blog has 'taken on a life of its own'.

To all who follow my Blog, once again thank you, thank you, thank you. I hope that you will continue to enjoy reading about my modelling and painting projects.

Tony

Wednesday 13 January 2010

Flintloque Buildings Set part nine


The snow continues to fall, here in the Midlands. It is not quite as heavy as we had last week, but enough to mean that I will not be going out.

As most of my new projects are on hold (they are safely tucked away in the shed-at-the bottom-of-the-garden) - I thought that I would post a detailed Workbench Article on how I model Spanish style tile roof models. I will use as an example the tiled roof of the tower in the Flintloque Building Set.

Steps One to Three - Using cardboard (packaging from an Aldi Roast Pork dinner), I marked out a square just bigger than the size of the tower roof, 80mm x 80mm and then drew four triangles - one to each side (figure 1). I then built an internal strengthening support from the same card, that was 18mm high at the centre and slotted so it would slide together and fit on top of the main roof base (figure 2). I then folded up the four triangles and using superglue on the inside and newspaper and uPVA glue on the outside I was able to produce the correct shape (figure 3).

By using more newspaper, some card fillers and PVA glue I built up the middle of the roof so that the slope was not uniform, but curved upwards (like a pagoda shape). The layers of newspaper and PVA glue make this particular structure very strong.

Photo Three - The individual tiles are small coloured beads from HAMA, each bead is cut in half, length ways and then glued onto the roof profile with undiluted PVA glue, starting with the main diagonals and then building the rest of the roof from the bottom up.

Photo Four - The roof about halfway through. Please note that the beads I am using are second-hand and have already been used to produce a plain resin, roof section 'blank', rather than throw them away after the master was taken out of the rubber, I am re-using the cut beads. In terms of time spent - there is not a great deal of difference between re-using old and cutting new beads as the old beads still needed to be cleaned up prior to use.

At this point I have superglued the cardboard former to a base of 3mm plastic card, the over-sized plastic card was glue to the base of the roof section, then cut and later sanded flush. A 6mm fillet will be glued to the bottom of this plastic card base and this will fit into the top of the tower.

Photo Five - Three of the four sections finished. Note the newspaper on the plain roof section.

Photo Six - The roof section now covered with Hama beads.

Photo Seven - As above.

Photo Eight - After a second coat of PVA glue is dry, I cover the whole roof with a mixture of ready-mixed filler (Polyfila), some PVA glue and a sprinkling of fine sand. I use an old brush and a stippling action to add texture to the otherwise plain plastic beads.

Photo Nine - As above.

Photo Ten - The next step is to use DAS modelling clay to fill any gaps and add some 'mortar' to the tiles and the roof top.

Photo Eleven - The DAS added. I use a spear-headed dental tool to push the DAS into the small gaps and later smooth the joins with a paintbrush dipped in water.

Photo Twelve - As above.

There is still some modelling work to be completed on this roof, I like to fill most of the beads or the rubber moulding compound is very difficult to remove from the master. In addition I may add even more filler-glue-sand mix to the tiles before having the roof cast.

This process takes quite some time, which is why I first produced a plain 'blank' and had this cast up for larger, plain roof sections (see earlier posts). For 'fiddly' roof sections such as this tower, the plain resin blanks would be too wasteful and (more than likely) take longer to produce than gluing the individual tiles.

I would expect to be adding doors and window frames over the next couple of days, then a bit of detailing or adding 'clutter' before taking it to be first moulded and then cast.

Should you have any question - you know where I am.

Tony

Tuesday 12 January 2010

My Daughter has exchanged contracts on her flat

Just prior to Christmas Holly exchanged contracts on a second floor flat. Since then Sue and I have been helping out with cleaning, painting and decorating and this week once new carpets are laid, we are expecting Holly to be moving in.

It is obvious that both Sue and I are very proud of Holly - purchasing her own property and given that it is just over 20 miles away, far enough for her independence, but close enough should we ever be needed in an emergency (like - feed the rabbit or I've left my curling tongs switched on).

Posts during the later end of December and now into January have been fewer than I would have hoped, but once Holly is settled. Modelling, Painting and Blog-ing should be back to normal.

Tony

Monday 11 January 2010

Flintloque Buildings Set part eight

The Flintloque Building Set - the plan is to have a three part set of Flintloque themed building that can be used either individually or combined to make one larger structure. The buildings will be cast in resin by Grand Manner and should be for sale in late February, the cost will be no more than £70.00, see earlier posts for more details.

Photo One - Progress to date, all three pieces are based and the wall texture has been worked upon and improved.

Photo Two - All three building feature internal detail, this piece has a tiled floor, the tower has a wooden textured floor and the small out-building also has tiles.

Photo Three - A detail photo of the main building.

Photo Four - A detail photo of the tower.

Photo Five - A detail photo of the smaller out-building.

My own plan is to have two sets - the first to be used as individual buildings and the second set will be modified to make a larger hill top feature piece. I have recently written on this Blog about my library of reference books (OK, scrapbooks) and while photographing the collection I came across some old adverts/images of buildings from Snapdragon Studio. The finish of these Flintloque themed buildings is very similar to the Snapdragon style, a style that I believe works well with the 'cartoony' Flintloque sculpts.

The plan for a release date of late February is still obtainable and any comments on these buildings or orders would be very welcome. In the mean time, I hope that you continue to enjoy how these building have developed and how I build models.

For those that are interested, I use DAS White modelling clay for most of my work, preferring it to Milliput and/or Green Stuff which I use in limited quantities for fine detail. I believe that the Terracotta DAS is finer and gives more detail, but is messier to work with and more difficult to find!

Tony

Sunday 10 January 2010

Scrapbooks a great resourse

It may be a little old fashioned of me, but I still use scrapbooks. OK, I may refer to them as sketchbooks or even reference resources, but in essence they are and always will be scrapbooks!

The illustration below is only a small part of my 'reference resource', to give you an idea as to how large this collection is. I have over 12 of the A4 ring-bound sketchbooks and about another dozen of smaller scrapbooks. The contents include pencil sketches or roughs, downloaded pictures from the internet, cuttings from newspapers and magazines and (one of my favourites) illustrations from modelmaking or gaming magazines and catalogues.

Those who know me will know that I never attend a wargame or model show without a sketch-book of some kind (I can usually be found with a pencil in one hand and a sketchbook in the other, frantically sketching a particular model or terrain piece) while family and friends know that a sketchbook or journal will always be welcome as a birthday or Christmas present. In fact for the last three years my son and his girlfriend have given me a sketchbook for Christmas (2009 being no exception) which is very welcome and soon put to good use, in this case the one in the front-left of the photo - with an illustration of Jane Fonda as Barbarella!

Even with the Internet, I still enjoy doodling and cutting up pictures that may (or may not) be of use to me at some stage. In addition the scrapbooks have come in very useful when meeting with prospective customers for DampfWerks projects, I can easily show examples of work-in-progress while also sketching down ideas. Dave at Grand Manner and I can spend hours checking through reference books and sketching ideas (those who know Dave or have been to his office in Bromsgrove will know how his walls and workbench are full of sketches and fantastic inspiration from all sorts of places).

The main reason for this rambling post is to point out to others how good a resource these books can be and recommend to others that they go back a generation (or two) and invest in a scrapbook to work as a reference book or just as inspiration when the creative juices are slow to flow. I will guarantee that it will be a fulfilling experience and one that will produce dividends.

As a further example, the second photo shows just some of the library books, loans and cheap charity shop finds that I am using as initial reference for my 40mm 'Sword and Sandal' project using Typhon from Alternative Armies as the rule set. I'll browse the children's illustrated history section of the local library for illustrations, then re-draw them in my scrapbook before (hopefully) producing some themed terrain.

In 2010 why not set yourself a New Years Resolution to (like me) invest in a scrapbook while attending wargaming or modelling shows?

Tony

Saturday 9 January 2010

Cold Weather update

The very cold weather and the scattering of snow has meant that I have been catching up on older projects and finishing outstanding commissions. Then Bill at The Miniatures Page (TMP) has included the Large Farm House post from earlier this week on the TMP front page. See;

Thank you Bill.

In addition I have been following with interest the new Blog by Steve Blease, a Blog of Blogs, see;

In principal, I am really looking forward to how this huge resource of wargaming Blogs will develop and be used. I have one issue with this and the similar La Figoblogotheque, see;

My problem is the loading time of these Blog links - it may be my computer, just old and slow, but the frustration I experience in waiting for these two Blogs to fully load is really annoying and then when you try to open a Blog via these links, I inevitably get a 'This link appears to be broken'.

There must be a place for such collections of Blogs, but also a way of showcasing them with more reliable links. Can anyone suggest if this is just me or does it happen to other Blog followers?

Finally on this point, I have recently been experiencing a delay in loading this Blog. Just poor weather, the amount of new Blogs or once again - my steam powered computer?

Good luck to Steve - I do appreciate the amount of work that such a project must take, well done and thank you for including Dampf's Modelling Page.

Tony

Friday 8 January 2010

Aircraft Resource Centre - Silly Week

No pictures this time - just a suggestion that you check-out the Aircraft Resources Centre or ARC over the next couple of days and take a look at the 'What if models' that members have posted during Silly Week.

For anyone not familiar - the best thing to do is check out this link;

The entries for this week in January feature aircraft models (and others) that have been modified, scratch built or painted with unusual colour schemes, they range from the plausible, to the down right ludicrous, but all worth a look.

My favourite (so far) are the Maltese Falcon and the Steam Powered SBC - 4

Tony

Wednesday 6 January 2010

Flintloque - Large Farm House part thirteen

Firstly, I must apologies for the delay in bringing you part thirteen of this building thread. Back in August 2008, this Flintloque themed building was my main modelling project, but a couple of short deadlines meant the whole building was shelved and when I started my DampfWerks business the Large Farm House became a portfolio piece that has been used to show my scratch-building skills. In addition I modified the model and removed the commercial castings (the barrels and cases from Grendel) in the hope that I could have it cast in resin and sold.

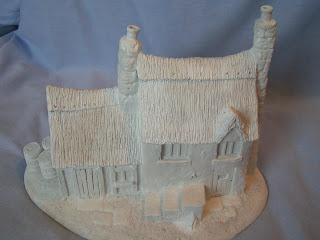
The whole building thread can be found on this Blog (see Flintloque Labels). These photos show the modified and finished model which will now either be painted or cast in resin if I can muster enough interest.

The model was built to 'Flintloque scale', approx. 1/48th or 36mm. and is 19.5cms x 18cms and 18cms tall (to the top of the chimney). The style is 'cartoony', English Civil War or French Country style and unlike my more recent models does not have a lift-off roof or internal detail.


The final two photos give a better impression of the whole model and the amount of detail incorporated in to it.


To have it cast I would require at least 12 firm orders, this is to cover the extremely large amount of rubber needed for such a building. I would estimate the cost to be around £50.00 per casting, but given the fact that I am already working on the Flintloque Building Set (see other posts) - which is due for production in February, I am not sure I could fund the initial outlay for the moulds for both of these projects. The rubber is really very expensive.

Should anyone be interested in placing an order please contact me - there is still the possibility that the model will not be cast and I could use it for my 40mm Eureka Musketeer figures. Similarly should any one want to purchase the 'master', please get in touch.

What even happens - I hope that you enjoy this and earlier posts which show how I produce my models.

Tony