Saturday 31 October 2020

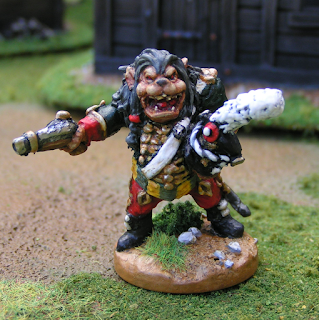
Colonel Vladimir Bayun - A special All Hallow's Eve feature for Orcs in the Webbe

It's All Hallows Eve and that can mean only one thing.....

I've written a special feature for Orcs in the Webbe. Colonel Vladimir Bayun is a new character race for Flintloque or more specifically Deadloque, for full details see this link.


The miniature is a highly modified MSB Toys Pigsy with the head from a Monster-in-my-Pocket Chimera.

I used loads of Green Stuff to build up the uniform details and mounted the miniature on to a 2p coin.

Painting was done with various acrylic paints and the mini was varnished with Galleria matt varnish before the base was decorated with static grass and static grass tufts.

Details of earlier Orcs in the Webbe All Hallow's Eve stories, scenarios and modelling articles can be found here.

Happy Halloween.

Tony

Thursday 29 October 2020

Plans for Winter


Over the last couple of months I have continued to write articles for both Miniature Wargames and Wargames, Soldiers & Strategy which should be published soon, however most of my spare time has been making wooden gifts for Christmas which has meant very little being posted on the Blog. Hopefully as hobby time in the garden becomes less comfortable with winter weather approaching I can move back into the shed-at-the-bottom-of-the-garden and once again start painting miniatures.

I'll also post some images of the gifts that I have been working on. But for now, stay safe.

Tony

Sunday 25 October 2020

The Crowsnest Chronicles by Roy C. Link


Earlier this week Sue bought me this book - The Crowsnest Chronicles by Roy C. Link. 

The magazine format book is the story of one mans obsession in building the same narrow gauge railway layout in three separate scales; 1/48th scale, 1/19th scale and 1/32nd scale. I'll admit that I have been an admirer of Roy's work for some time and already have many of his articles and illustrations in my Narrow Gauge reference resource, for example Narrow Lines (the magazine of the 7mm Narrow Gauge Association) and the Narrow Gauge and Industrial Railway Review. In fact many of the illustrations are reprints from the later magazine but this 2020 publication ties together all of the articles and much more in this beautifully illustrated single volume.

I found myself browsing through the book and marvelling at the photographs and illustrations. The book details how Roy has planned and scratch built almost every detail of the layouts and is currently developing a fourth diorama layout in 1/16th scale! A real labour of love. This is a book I know that I will enjoy reading from cover-to-cover.

For more details see this link.

The Crowsnest Chronicles - Journey of a modelling lifetime... by Roy C. Link

Published by RCL Publications (2020)

96 pages, 174 photographs, 25 drawings, diagrams and plans

ISBN 978 - 0 - 9565157 - 7 - 3

List price £9.95

I'll review the contents at a later date - once I have had time to read it but for now, and based on the beautiful illustrations and subject matter - I'll give it a five star review.

Tony

Thursday 22 October 2020

Scratch built well

This latest Blog post shows how I built and painted a small well from scrap material I had lying around. The design was copied from an actual stone well image found on the internet.

I started with a 3mm thick plastic card base and built the stone well from scraps of blue foam glue together with woodworking PVA glue.

The water area was another section of 3mm thick plastic card and any gaps were filled with DAS modelling clay. The base or groundwork was built-up with DAS and textured with sieved sand applied over PVA.

Detailing and decoration was done with more bits and pieces from the spares box. The water bottle was a modified Knex piece and the decorative pot to the side is a plastic bead.

I have used more blue foam to built the capping stones around the top of the well.

Here as an image showing the well from another direction. The base is 100mm x 110mm.

I started painting with a mix of different greys with a hint of flesh colour scrubbed on in a haphazard process which allows many different colours and tones to show through - a more natural stone effect.

The water area was painted in a bright blue, darker to the edges and lighter in the centre. The water bottle was painted in a terracotta brown with a white glazed top.

the base or groundwork was painted in dark brown with lighter drybrushing and the odd stone picked out in grey (mixed from black and white) then highlighted with white.

Prior to taking this image, I 'washed' the base with a dark tone wash.

After varnishing with Galleria matt varnish and then adding gloss varnish to the surface of the water, I decorated the base with a mix of different flocks.

The small well from another direction showing the natural stone colour and the use of 'spot colour' - the orange pot.


The final image shows a 28mm scale Pax Bochemannica Boche alongside - to give an idea of the scale of this simple piece.

The model is pretty generic in style and could be used for a wide variety of different periods/genres. It took less than an afternoon to build and paint and would be a great project for a beginner.

Tony
Wednesday 21 October 2020

Sanding boards

Over the last month,  have updated a number of my sanding boards or sanding sticks. 

The first is a toughened glass chopping board with two grades of abrasive paper stuck down with double-sided carpet tape.

The second example is a glass shelf with some 3M's abrasive paper - again stuck down with double-sided tape.

This is a wooden ruler with some 60 grit and 120 grit abrasive paper stuck to one side - I use it as a rough file to clean up the metal bases of models.

Finally - another glass shelf (from a medical or toiletries cabinet) with some Tamiya fine abrasive paper stuck to one side.


I prefer using these sanding boards or sanding sticks to plain abrasive paper or files as they give more control and if the sanding stick is made of wood - you can customise it to your particular needs.

I use them all (and others) on a regular basis.

Tony

Tuesday 20 October 2020

Hand tool restoration - a pair of utility knives

Another quick tool restoration post.....

The first is the simple Stanley 199A - I striped the handle down to bare metal and primed before spray painting it red. The red was left over from when I painted the red rocketship on the Crashed Rocketship Gaming Board (see this post). Unfortunately I can't find the 'before' images, so you will just have to be satisfied with the 'after images'. This is my go-to work knife and I can confirm that it has been and is very well used.

The second is this Draper TK202 utility knife. 

As you can see this was very well worn, with chips and dents. I repaired the major dents with a large bolt and hammer then removed some of the cast-on detailing with a file.

I stripped it down and primed with spray primer before painting it with acrylic enamels. I used a soft sponge roller to paint it, but didn't like the effect so 'splattered' it with more acrylic paint which gave it a rough texture.

This knife sits in my wife's gardening trug and is also a well used utility tool.


Both knives were restored some time ago as an experiment following some You Tube videos showing custom restorations of Stanley 199 utility knives. If you have time check out this link to see some fantastic restorations.

Tony

Saturday 17 October 2020

Hand tool restoration - antique mallet


Following close on the heels of my recent woodworking plane restoration, see this post for details, I picked up this wooden mallet from a charity shop. When I saw the mallet. I was not sure that I would buy it, it looked wrong - the head was too tall and boxy, while  the handle was too long but for just £4.50, I thought it was worth a gamble.....

I stripped down the parts - there wasn't that many!

Then started the modifications and clean-up.

I used simple hand tools to sand and re-profile the head, diluted bleach to clean the wood and then cut a 1/4 inch (6mm) strip off the bottom of the mallet head to make it less bulky. The handle had 30mm cut from the base before I polished the whole tool with clear wax. I think it looks a whole lot better now.


The distinctive dark grain adds character to this simple tool and in the end I think the restoration works. I have no intention of restoring more tools but I  have to admit to a feeling of satisfaction when I take a well worn old hand tool and restore it.

Tony

Friday 16 October 2020

Typhon - painting one mini at a time the latest update

I've tried to copy the colour scheme from the 1963 film - Jason and the Argonauts on this miniature.


Once the figure of King Aeetes was painted, I varnished the figure with both gloss and matt varnish before decorating the base with static grass.

The final image, showing the Spartan Games Aeetes alongside one of the painted skeletons from my 40mm Typhon collection.


Tony

Wednesday 14 October 2020

Typhon - painting one mini at a time another update

Another update. This time King Aeetes a character miniature from the Spartan Games range of 40mm metal figures.

The first image shows the slight modifications I did to the model which was then primed with Tamiya spray primer. As with the bulk of my 40mm Typhon figures, the model is mounted onto a pre-decimalisation penny with the groundwork built up with Milliput.  

The second image shows the figure painted in a dirty brown basecoat which was then washed with a dark tone wash from Army Painter.


I'll try to get some more painting done this week.

Tony

Monday 12 October 2020

Typhon - painting one mini at a time update

Another single figure addition for my 40mm Typhon collection. The base figure is a 40mm Lord of the Rings mini - part of the Lord of the Rings Combat Hex range of plastic figures. I removed the soft plastic spear and replaced it with a new spear modelled from a length of cocktail stick with a new spear head. The shield was a metal shield that I found in my spares or bits box. The figure is mounted onto a pre-decimalisation penny with the base built up with Milliput epoxy putty.


The final painted mini alongside one of my Spartan Games 40mm Hoplites.

Tony

Saturday 10 October 2020

Practical and Simple Wargame Terrain - part seven

Issue 451 of Miniature Wargames (November 2020) has another of my series of article showing how I build practical and simple wargame terrain on a budget. Part seven is a Stone Cottage inspired by the resin models from Snapdragon Models. The model was built over a corrugated cardboard core with egg box card stones and slates. As with the earlier models I used these simple rules;

1 - The model should be constructed from simply sourced or everyday materials.

2 - The model should be generic and able to be used in a wide variety of different games or genres.

3 - The model should be robust enough for wargame club use.

4 - The model should be finished to a good standard and resemble the building it represents.

5 - Finally, it should fit into a 6 inch x 6 inch x 6 inch box - for easy storage.

For details of this latest issue please see the this link.

I have included these images of the earlier tutorials;

A timber framed house inspired by the Pardulon resin models.

A round dovecot.

A thatched cottage.

European Barn.

A wooden shack.

A simple thatched hovel.

Tony