Tuesday 29 June 2021

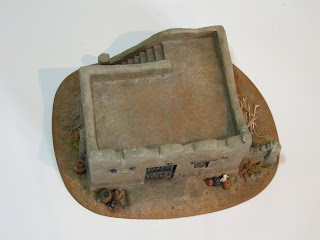
Scratch Built Adobe - for sale on e-bay

SOLD

I am continuing to sell off items of terrain I no longer use. The latest is this scratch built 28mm scale adobe suitable for a wide range of different genres/games. The adobe was built some time ago and features in the Pen & Sword book - Wargame Terrain and Buildings - North Africa and The Middle East written by me.

The adobe was built from cardboard, foam and DAS modelling clay with a number of resin pieces added to the base as decoration. The main building is 135mm x 115mm x 80mm tall it is mounted on to a 3mm thick plastic card base 210mm x 170mm.

For details of the e-bay auction see this link.


Thank you.

Tony

Friday 25 June 2021

Nano Gel Tape

Earlier this week I picked up a pack of this super-sticky, double-sided Nano Gel Tape. I'd been looking at different Velcro tapes/packs and when I saw this I thought I'd try this instead.

I bought my pack from The Range, for £2.99 for a 1 metre pack. For more details see this link.

The tape comes in the standard roll about 30mm wide. I thought it would be ideal for holding miniatures onto my home-made cork painting handles and tried it out on this based but unpainted 28mm figure as you can see in this images. 


The Nano tape holds the mini securely, however it is too secure and trying to remover the mini proved difficult as the tape is super strong. So much so that I thought I would damage the figure by having to apply too much force. In the end I used a knife to prise the mini and base from the tape.

Conclusion.....

The tape is extremely strong and I'm sure will have many uses, but securing figures to my cork painting handles will not be one of them. It is just TOO STRONG. In future I will revert back to my tried-and-trusted BlueTack.

Tony

Thursday 24 June 2021

The Yellow Pelican Mining Co. - painting the tunnel entrance

The completed tunnel entrance has now been painted - I used various acrylic paints to copy the well-worn and aged wood effect I had seen on the internet.

The internal shuttering was painted in the same way. Above is the internal (right) edge and below is the external (left) edge. Both shown with a 1:27.7 or 11mm = 1 foot scale figure.


The final two images show the entrance and shuttering placed on the kitchen table and outside patio paving to show the finish I was looking for.


Tony

Monday 21 June 2021

The Yellow Pelican Mining Co. - the tunnel entrance

The left hand side of the layout will disappear into a crude tunnel entrance built from huge wooden supports while the tunnel interior will be defined with some wooden shuttering.

The first image shows the start of the wooden shuttering. Built from scrap wood and DAS modelling clay over some 3mm thick plastic card the walls have been detailed with plastic card and florists wire.

The wooden tunnel entrance was inspired by a mine entrance I found on the internet and built from some spare balsawood blocks. The entrance has been scaled to accept the narrow gauge engines (just).


The final image for this post shows the first parts built (but not glued down). I still need to determine how far around the entrance needs to come on the layout and build the right hand shuttering and paint them.....

Tony

Sunday 20 June 2021

Magazine Haul

As a Father's Day treat Holly accompanied Sue and I for a walk along the river front in Bewdley. Although the weather wasn't great we enjoyed our stroll, feeding the ducks and watching the rowers.

Before returning home I stopped off at Bewdley railway station on the Severn Valley Railway and picked up this selection of second-hand, foreign language railway magazines.

You may wonder why?

Well these magazines nearly always have a specialised model making section - for example this article by one of my favourite authors Emmanuel Nouaillier and at just 20p an issue - it's a real bargain bucket treat.


I'll enjoy looking through them over the next couple of weeks, cutting out articles I want to keep and then passing them on to a cadre of railway modellers in Droitwich.

Tony

Friday 18 June 2021

Another project for the Grandchildren


Regular updates have been delayed this last couple of months as projects for the Grandchildren have taken priority. The latest is this old TEA box painted for Finley to keep his ever growing collection of fossils safe.

I can confirm that I have also been working on a variety of magazine articles and I'll post details once they are published.

Tony

Saturday 12 June 2021

A Scratch Built Epic Scale Barn for ACW gaming

Issue 459 of Miniature Wargames (July 2021) has another scratch built modelling article written by me - this time a traditional red barn built to match with the Epic Scale ACW plastic figures from Warlord Games.

The model was built over a balsawood former and I used card and DAS modelling clay to model the features. 

For more information, see the full article in MW.

The model was built to accompany the earlier Epic Scale church, details of which can be found on the Blog. See this link for more details.


Tony

Wednesday 9 June 2021

Stanley No.199 - fully restored

The Stanley No.199 - fully restored and finished. I have to say that I'm very impressed with the finished knife, for more information, see this earlier post showing the knife prior to restoration.

The knife has been cleaned, polished and painted with a blue wash prior to being waxed and finished.


A £1.00 find at The Malvern Flea Market has been transformed into this beautiful working knife with nothing more than elbow grease and clear wax. I'm very happy with this restoration.

Tony

Monday 7 June 2021

Midlands Air Museum, Coventry

Yesterday Sue and I had the pleasure of 'babysitting' our grandsons, this is the first time in over 18 months that we have been able to take them out and we choose to take them to the Midlands Air Museum.

For more details of the museum see this link

We all had a great time enjoying the outdoor exhibits and even having a picnic/snack under the wing of the huge Argosy 650.


This was our first visit to a museum in some time and I have to say that everyone at the museum made us feel safe and welcome. Thank you.

Tony

Friday 4 June 2021

Stanley No. 199 - a Flea Market bargain

My last Flea Market purchase was this Stanley No. 199 knife which was a real bargain at just £1.00. My intention is to polish the aluminium handle and then 'clearcoat' it like the Stanley No. 199 refurbs that can be seen on Scout Crafter's You Tube channel, for details see this You Tube link.


This is not going to be a 'quick fix', so don't expect daily updates, but I will post images once the knife is done.

Tony

Wednesday 2 June 2021

Large Rasp - another Flea Market bargain


The large metal rasp was also picked up from a bargain bin at the Malvern Flea Market, but this time it cost me £2.00. When I got home I fitted the wooden handle (a handle from an old garden spade) and waxed it with clear wax.

As you can see this is a big tool and one that I'm sure I will find a use for. I already have a couple of files, but no rasp.

Tony

Wooden Mallet Refurb - update

Following on from yesterdays post I showed the finished mallet to Holly who suggested that I add a hook to the bottom of the handle so I could use it to pull the tent pegs from the ground. I found a suitable hook in my bits box and after drilling a hole I fitted a medium sized metal hook to the handle. 


Thank you Holly for the suggestion. I now have a custom Camping Mallet ready for the next time we go camping. 

The wooden mallet is just over 30cms long.

Tony

Tuesday 1 June 2021

Wooden Mallet Refurb - a Flea Market find

This sorry looking wooden mallet was one of the tools I picked up at The Malvern Flea Market yesterday. It was found with some other tools in a £1.00 bargain box.

As you can see it was in a very poor state, but I've been on the look out for a camping mallet (ever since Holly pinched my universal wooden mallet for her own camping tool box).

Stripping the parts was a bit of a pain as the nail holding the head to the shaft was both rusted and broken.

Once taken apart, I used the chop-saw to cut about 5-8mm from each side of the head and about 25mm from the bottom of the handle.

Here you can see the newly sized mallet prior to sanding.

I enjoyed sitting in the sun and sanding the head and handle - very relaxing.


I used standard finishing wax to polish the pieces before gluing the handle back in place. I also used a stainless steel pin to 'lock' the head in place.


£1.00 from the bargain box and I now have a very good looking camping mallet, ready to knock those tent pegs in place when we next go camping.

I really enjoy renovating old tools and I know that I could have done better - but this is a working piece not a display piece, so I happy.

Tony