Monday 29 September 2008
Flash Gordon - The Crashed Rocketship
For anyone not familiar with this very long-running project. I have been planning a crashed rocketship skirmish board for some time - maybe years. I finished the Flash Gordon rocketship ages ago - see earlier Flash Gordon entries, but the board which was initially planned as a 3 foot x 3 foot board has now been built (2 foot x 2 foot), sculpted and painted.
I have promised a complete article, 'how I built it' and 'how I painted it' to Richard at Rattrap Productions LLC (see; http://www.rattrapproductions.com/). Part one is already complete. Once I have a finished board I promise to post a link and some actual in-game shots.
For now, not even a 'teaser', oh OK, just one - a rough pencil sketch, showing the first designs, inspired by the Alex Raymond comic strip rocketships, but believe me the full article/articles will be worth the wait!
Tony
Friday 19 September 2008
Flintloque - Windmill
http://www.alternative-armies.com/60_Bloody_Rounds_Fanzine.htm
The full article is due to be included in the next issue (November/December), but I just couldn't resist including this one posed photo as a teaser. The figure is a Grenadier Guard, the subject of my latest Flintloque regiment and the photo is taken on my flock-covered gaming board.
"If you want to read more or see how I made it - sorry, you will just have to wait until issue #3 of 60 Bloody Rounds, due out in November."
Tony
My 165th post - a very special occasion and milestone for me and this Blog.
Steam Airplanes
I had already produced a VSF, steam powered flying machine model - a William Hensons Aerial Steam Carriage. See below;
The construction was based on the Fiddlers Green Aerial Carriage and re-scaled to 1/300th (or 1mm = 1foot). Construction started with the main body, which was first carved and then sanded to shape. The wing and tail are 1mm plastic card and the struts are sanded cocktail sticks. Other detail comes from the spares box or plastic card/plastic rod.
The model is 80mm long, has a wingspan of 130mm and the main carriage is 12mm tall.
Painting was carried out with acrylics and the markings were hand painted - a Texan blockage runner. The flags are just plain paper and the propeller discs are from clear plastic packaging blisters.
Here is a new photo, taken in natural light, which I think shows off the model better than the previous four photos.
Tony
Thursday 18 September 2008
Flash Gordon - Buster Crabbe
http://www.gohero.com/flash_gordon/earthman.htm
I look forward to seeing the finished figure and hopefully range of figures. I wonder what scale that Dr Zarkov's die-cast Rocketship is?
Tony
PS. there's also a link to Buck Rogers.
Sunday 14 September 2008
Flash Gordon - Robots (the animated series) part four
Flash Gordon - Lizardman
Mounted on a 40mm round base the model is 46mm tall. The claws on the feet had to be cut off and re-modelled with 'green stuff' to fit the 40mm base and the green colour scheme is a little predictable, but I like the miniature and it fits a classic Lizardman profile better than others I have seen.
The casting was very well done, with fantastic skin and scale texture. The miniature was painted over a black undercoat with a mixture of acrylic paints.
The service from Lance & Lazer Models was very good, with the figures arriving from America within 14 days of ordering. There are others in the range that I would expect to order in the future, but for now I will try to paint the lead mountain I already have before ordering any more!
Tony
Saturday 13 September 2008
Inspirational Artwork
http://www.keiththompsonart.com/index.html
Tony
Thursday 11 September 2008
Flash Gordon - Robots (the animated series) part three
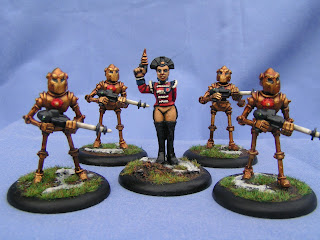
The third photo shows the new heads in profile. For more details on how they were made and cast - please see earlier posts.
The miniatures were painted with a mix of acrylic paints over a black and dark brown undercoat, then washed with Games Workshop brown wash before the detail was picked out. A variation from the animated series colour scheme are the black eye sockets rather than red. I felt that the red eye colour just looked wrong.
The robots are varnished with a 'custom mix' satin varnish - 50% Kleer and 50% artists matt acrylic varnish. I have stated in the past that I feel gloss varnish just doesn't look right. The base is all matt.
One recommendation concerning these superb miniatures - I would suggest that any painter thinks about painting the individual arms separately and gluing the figure together when the paint has dried. The manufacture of the figure makes painting the rear of the gun very difficult once the figure is constructed. In addition any modeller who knows these miniatures will see that legs and poses have been altered slightly to offer some variation - cutting the base and moving the legs either further apart, closer or forward.
Each miniature is mounted on a 40mm round base and stands 45mm tall.
Tony
Monday 8 September 2008
Flash Gordon - Robots (the animated series) part two
As detailed in the earlier entry I wanted to model some 40mm robots based on the Hydra Legionnaire Robots and inspired by the golden Ming Robots in the animated series flash Gordon. My first job was checking out the series on You Tube and making rough sketches. The problem with the series is that the design and drawing of the robots, profile and straight-on do not match up. The final drawings were an amalgamation of two or three images and sketches.
Once I had the design I wanted, I re-scaled the drawings to the same size as the Hydra Robot heads (about 10mm tall) and modelled the shape from lamination's of plastic card. The initial shape is very much like a traditional viking helmet. The shape was first carved and then sanded smooth. Please note - the finished head was the third attempt, the first two being discarded long before I started to add 'green stuff'.
Modelling with 'green stuff' followed and this was pretty easy. The only issue I had was the two 'eyebrows' which being so small, but such an important part of the cartoon robot needed to be modelled with some care.
I then needed to make a mould. I used a product called Siligum, a silicone moulding paste made by Gedeo which you can pick up in specialist arts and crafts stores. It is a two-part soft clay material, which comes in blue and white parts and when mixed you have about 10 minutes before it goes off. I used a Plasticine base in a Lego box and then pressed the Siligum into the Lego box with a small plastic card rectangle. Once the first part was set, I produced the second part in the same way - with a Vaseline barrier between the two parts.
I cut a small air vent that will help later, which was carved as an extension to the neck of the robot head and now on to the resin casting. I mixed up some standard two part automobile repair resin, bought from Halfords and while I was waiting for the two parts to react, I brushed on some warm Vaseline to the two part mould. I added the resin to each of the mould halves and prior to going hard, pressed the two mould halves together. I use two small pieces of plastic card either side of the mould and gently squeeze the mould to ensure that the resin is fully filling the mould.
DANGER; I then blow into the vent hole that I carved into the mould. I believe that this forces the resin into all parts of the mould and should give a better casting. I am not sure how safe this is, so anyone copying this technique should be very careful.
The mould is left for about 20 minutes while the resin fully sets and then the head was removed. five castings later (actually six as one of the castings had a huge air bubble) I have my Flash Gordon Robot heads. They were washed and cleaned, then sanded smooth with a fine sanding stick, before the neck area was cut to size and super glued to the bodies.
The only issue I had during the whole modelling/casting process was the large amount of waste resin, caused by having to mix up six separate cups of resin, one for each head. I am not sure that there is an easier way to do this?
The five miniatures were then undercoated and sprayed black, before I started painting the figures. I hope that this tutorial helps other modellers produce their own castings.
Tony
Sunday 7 September 2008
Flash Gordon - Robots (the animated series)
The robot head needed to be completely scratch built from layers of plastic card and 'green stuff'. The photos below show the prototype head and the conversions I have done to the robot chests, which now display the Ming 'sun-burst' motif.
I have started to mould and cast the five heads in resin (automobile repair resin from Halfords) which takes some time, due to the mould cleaning and resin setting time, however by the end of today I will have my five robot heads cast in a rather fetching rose coloured resin! Once they are cleaned up I will attach them to the finished bodies with super glue and try to take some more photos before I start to paint.
I would have liked to have re-modelled the legs and arms to closer resemble the Flash Gordon robots, but I feel the new heads and chest detail should be enough.
Friday 5 September 2008
First weekend of September
The main project all this week has been a Flintloque or Spanish style windmill. The full article and photos will eventually appear here, but for now the project is being rushed-through for the next edition of the Flintloque/Slaughterloo Fanzine 60 Bloody Rounds. The construction is complete and if I have time this weekend I will start the painting.
The second project is a group of Hydra Miniatures Legionnaire Robots, which I am hoping to convert and paint (new heads and small details) to resemble the Ming Robots in the animated Flash Gordon series. The miniatures stand about 40mm tall and are perfect for my 40mm Flash Gordon collection. All five miniatures, well the bodies (no heads or arms yet) have been mounted onto 40mm round bases and the groundwork built up with small pieces of cork and DAS.
The Large Farm House has taken a 'back seat' for now, but this is just while I work on the windmill model and magazine deadline.
Tony