Friday, 1 May 2020

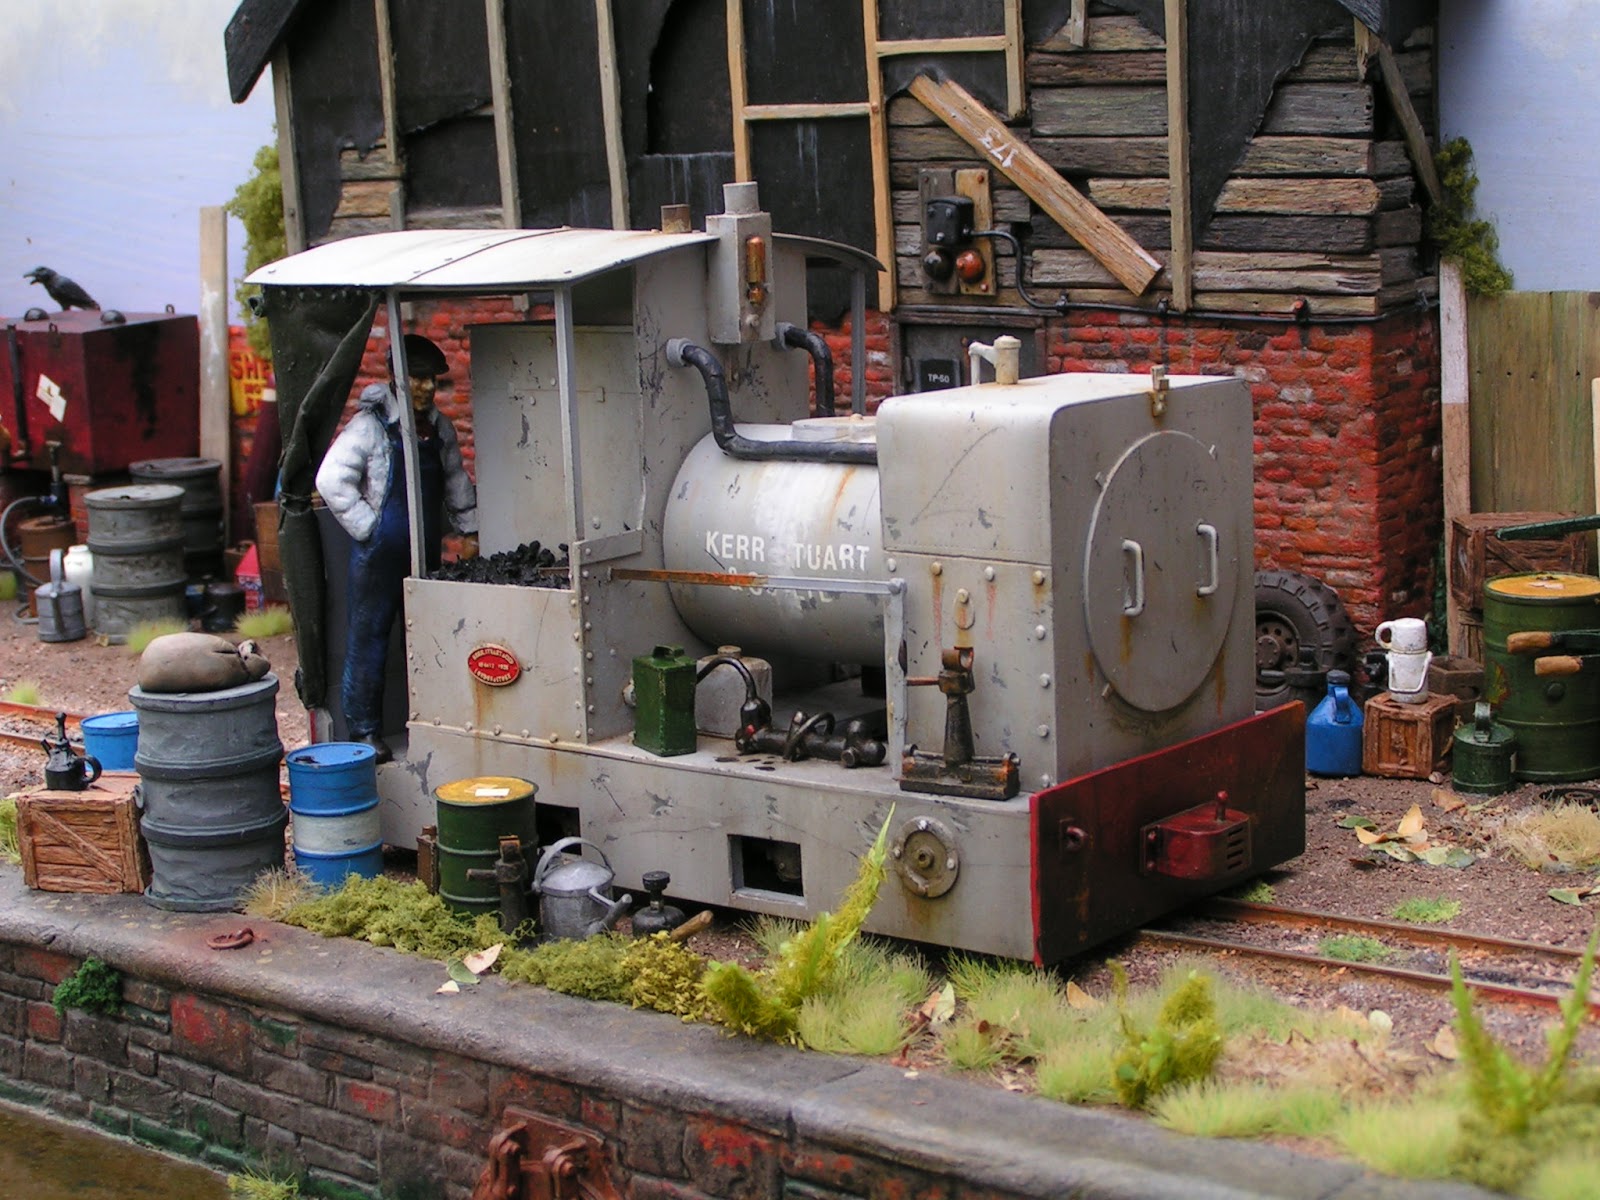
Kerr Stuart 4412 - Narrow Gauge World May 2020


The latest issue of Narrow Gauge World (issue 147 - May 2020) features my scratch-built model of the Kerr Stuart Geared Steam engine number 4412. The model was built to the unusual scale of 1/27.7 or 11mm = 1 foot running on 16.5mm narrow gauge track representing an 18 inch industrial line.

The model was built some time ago to run on my diorama or shelf layout. details of which can be found by following the 1:27.7 link to the right.


This is the first of what I would hope will be many, many modelling articles to feature in NGW. Narrow Gauge World is published nine times a year by Warners Group.


Stay safe

Keep Calm and Carry On Modelling

Tony
Monday, 27 April 2020

The Chapel at Rofenburg - part ten


The spire was built in sections, from a cardboard and balsawood base with cocktail stick detailing for the roof section or bell tower structure and some Blue Foam covered in glossy paper for the main ‘witches hat’. 

Detailing was done with more gloss card and another cocktail stick. This was the third spire model I had constructed for this model. I just couldn’t get the shape and dimensions right. It really was a case of try and try and try again.....


The four main supports for the overhanging roof section were built from Balsawood cut into 7mm x 7mm strips before being trimmed to shape and glued in place with superglue. Another case of try and try again.

Further detailing was done with plastic card strips and plastic rod rivets glue in place with superglue.


The next post will show how I start the painting.

Stay safe

Keep Calm and Carry On Modelling

Tony

Saturday, 25 April 2020

Flintloque Regiment Lowland Dwarves - finished


The final part.....

The standard was based on an image I found on the internet, it was first drawn onto a self adhesive label and then painted with acrylic paints. I folded the standard around the pole and trimmed it to fit before adding some folds and painted on highlights. Nothing too complicated, but now I can declare the regiment of Lowland Dwarves finished.

They have been great fun to modify and paint - I really should get around to painting more.


Stay safe

Keep Calm and Carry On Modelling

Tony

Friday, 24 April 2020

Flintloque Regiment Lowland Dwarves - part twelve


The eight Flintloque Dwarves have been varnished first with a gloss varnish and then with Galleria Matt Varnish. I have added some static grass, static grass tufts and green ground foam to the finished bases. I just need to design and paint the standard and the Lowland Dwarves will be ready for the table.....


Look out for the final post very soon.

Stay safe

Keep Calm and Carry On Modelling

Tony

Wednesday, 22 April 2020

Flintloque Regiment Lowland Dwarves - part eleven


The modified Lowland Dwarves are nearing completion. The guns and equipment have been painted and I have used various metallic paints to touch-in the Shako decoration and detailing. I started with a dark brown base and highlighted with Old Gold, then Shining Gold and finally a Shining Gold and silver mix to add the final dot highlights.

In addition the bases have been given another light wash to further define the groundwork. The standard bearer has received a new standard pole which was cut from a plastic skeleton miniature.


Not much more to come. We should see the finished Dwarves very soon.

Stay safe

Keep Calm and Carry On Modelling

Tony

Tuesday, 21 April 2020

The Chapel at Rofenburg - part nine


The two side windows were first drawn on to some spare card and then cut out with a new scalpel blade. The card window frames were glued in place with a sheet of green weave fitted behind. The weave was packaging material from a fresh fruit carton.


The main doors were carved from a single piece of 3mm thick plastic card. I first cut out the joins, and then textured the wood with a scalpel and some coarse sandpaper. Additional detailing was done with slivers of plastic card and plastic rod. Both the windows and the doors were glued in place with superglue and the openings further refined and detailed with DAS modelling clay laid over PVA glue.


The groundwork was further textured with fine sand applied over dilute PVA glue.


Stay safe

Keep Calm and Carry On Modelling

Tony

Monday, 20 April 2020

Sanding boards/Sanding sticks


Lockdown has meant I have much more free time than usual. I've spent a day tidying up the shed-at-the-bottom-of-the-garden and reorganising my workspace.

One of the changes I have made is to add some upturned wallpaper to my workbench - an idea that I first saw on a You Tube tutorial site. It allows me to have a new. clean work area at the change of a piece of paper.

I have also updated my sanding sheets (these are glass cutting boards with abrasive paper attached with double sided tape). I first removed the old sandpapers and cleaned the glass before adding fresh abrasive paper over double sided tape.

Image one

The new sanding plates and one sanding stick.


Image two

The largest on the cutting boards - actually a Brabantia glass cutting board - this one with two different sanding sheets attached to one cutting board.


Image two

Another glass cutting board - this one with 3M's abrasive paper 240 grit.


Image three

A glass shelf (a toughened glass shelf) with Tamiya fine abrasive paper also attached with double sided tape.


Image four and five

A wooden ruler with two different sand papers/abrasive papers attached, the lower image shows the reverse.


The sanding stick will be used like a file or emery board, the boards will be used to sand items smooth. I like to have a variety of different grits for different projects.

Stay safe

Keep Calm and Carry On Modelling

Tony